🎨 I Turned a Tiny Wi-Fi Cube Into a Stats Display for My Mac Studios
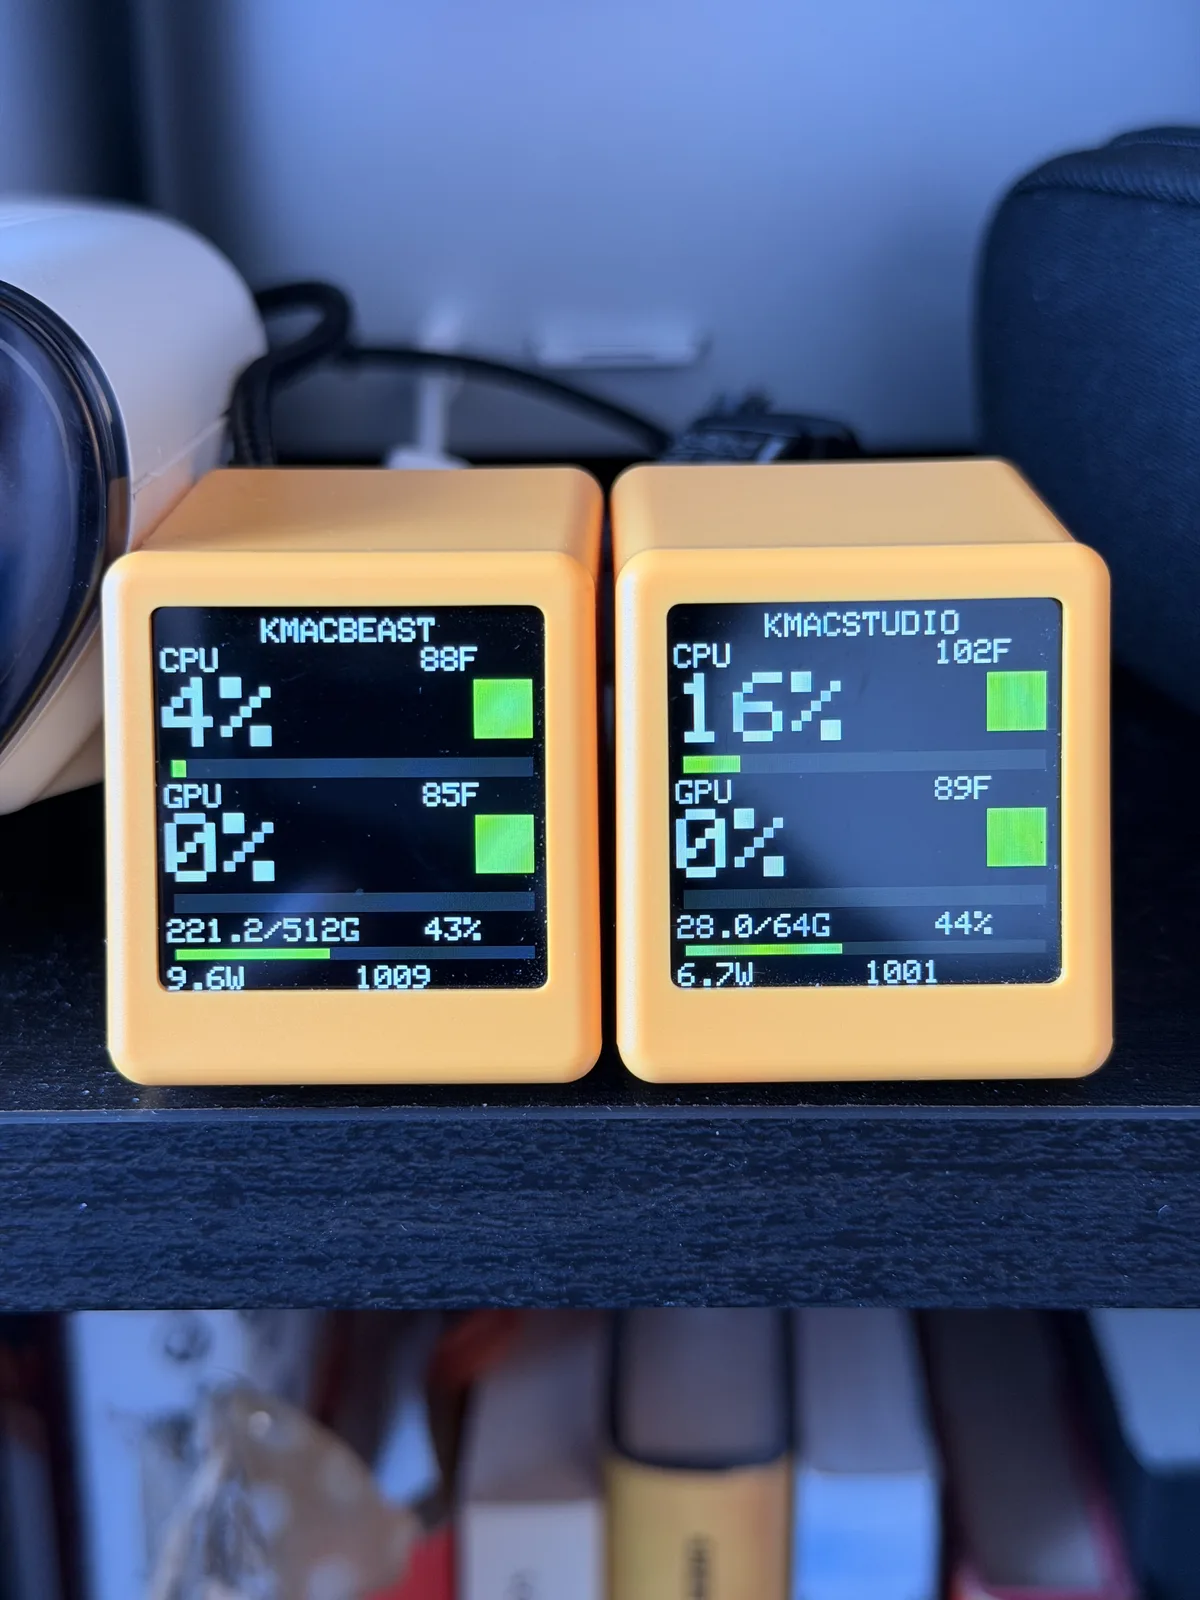 One cube per Mac Studio: Beast on the left, my other Studio on the right.
TL;DR: The GeekMagic SmallTV-Ultra is a cheap 240×240 desk cube with an ESP8266 inside. I wrote a tiny Mac daemon that serves CPU, GPU, memory, temperatures, power, and fan speed as JSON, plus custom firmware that fits in the cube’s stock update slot. You upload it through the cube’s own web page, so you don’t need to open the case or solder anything. Now each of my Macs has a little glowing dashboard next to it.
I have two Mac Studios doing real work—one I call Beast, and the other just goes by kMacStudio. Both run headless, with no monitor attached, so there’s no casual way to see whether they’re busy or whether a job is even still running. I kept opening Activity Monitor over Screen Sharing just to check whether something was pegged. That’s a silly amount of effort to answer “is it working right now?”
I’d already built Semaphore, a custom USB-C board with LED status lights, but that only solves part of the problem. It’s good at telling me when a process or agent changes state. It can’t show me the running numbers—CPU, GPU, memory, power—which often tell me something different, like whether a job that says it’s working is actually doing anything. I wanted a glanceable thing on my desk, the way a car has a temperature gauge instead of a diagnostics menu.
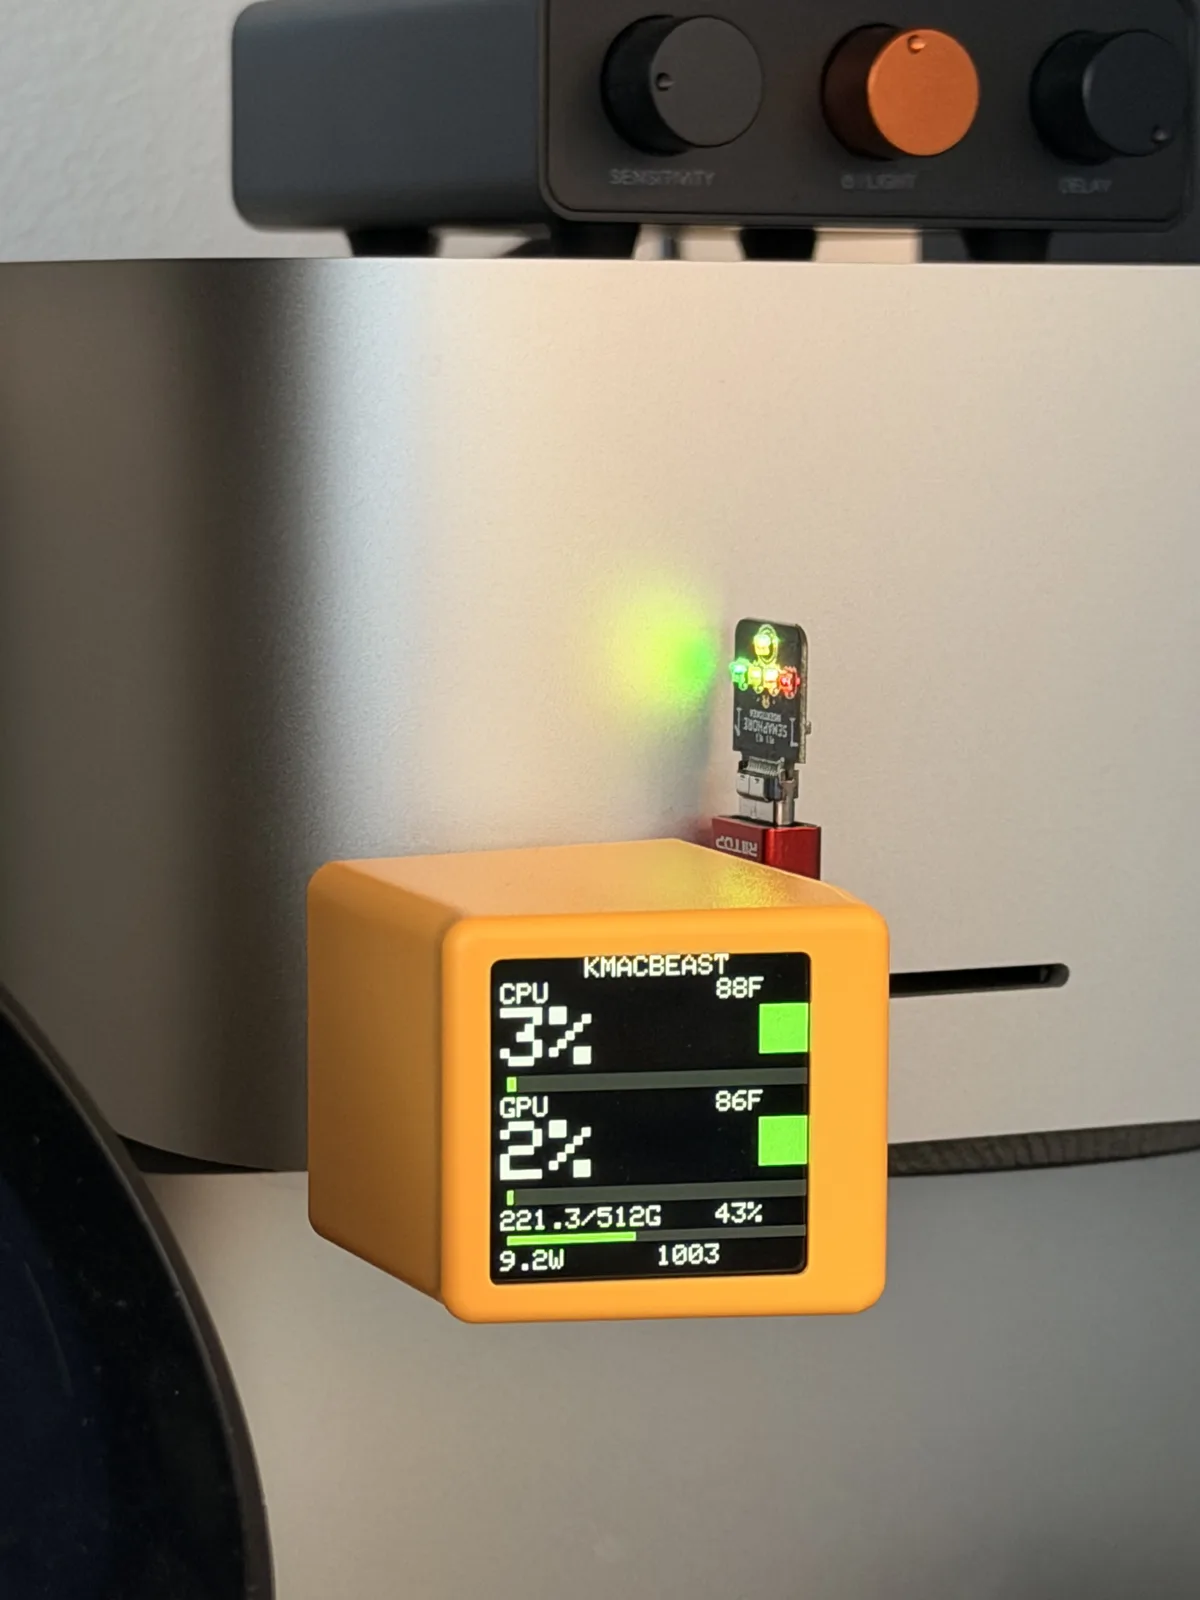 Semaphore up top shows state changes; the cube underneath shows what the machine is actually doing.
The SmallTV-Ultra turned out to be almost exactly the right object. It’s a little cube with a 1.54-inch IPS screen, a USB-C cable for power, and Wi-Fi. Out of the box it shows weather, a clock, and GIFs. It’s also, underneath, just an ESP-12F (ESP8266, 4 MB flash) driving an ST7789 panel—which means it’s hackable.
Where to get one
I bought mine on AliExpress for around $10 each. Right now the GeekMagic SmallTV-Ultra is $13.32 on sale (as of October 2026), so watch for a deal. If you’d rather skip the AliExpress shipping wait, there’s one on Amazon for $18.99. It’s listed under a generic brand and looks identical, but I haven’t bought that one myself, so check that it’s the Ultra. A few things to check before you buy:
- Get the Ultra, not the “Pro” (the Pro is a different chip). The original non-Ultra SmallTV is the same board, but I’ve only tested the Ultra.
- Mine shipped with stock firmware Ultra-V9.0.50. The flashing approach below relies on the Ultra’s built-in web updater.
- It only does 2.4 GHz Wi-Fi. The ESP8266 has no 5 GHz radio, so if your router splits bands, the cube has to join the 2.4 GHz one.
How it works
There are two pieces:
Mac   macmetrics → http://<mac>:9123/metrics   (LaunchAgent, no root)
         ^
         |  plain HTTP, about once a second
Cube  ESP8266 firmware → draws the dashboard
On the Mac, macmetrics is a small daemon that answers GET /metrics with compact JSON:
{
  "name": "MacBook Pro",
  "host": "macbook-pro.local",
  "cpu": 23.8,
  "gpu": 26.0,
  "memory_used_gb": 93.3,
  "memory_total_gb": 128.0,
  "cpu_temp_c": 74.4,
  "gpu_temp_c": 65.2,
  "fan_rpm": 1915,
  "power_w": 47.3,
  "timestamp": 1790314037
}
I modeled the numbers on Stats, because I already trusted it. CPU comes from the kernel’s load counters, GPU from the IOAccelerator utilization key, and temperatures are averages of the same SMC sensor keys Stats uses for each chip generation. Power is the SMC system-total reading, and fan speed is the fastest fan. Memory uses Stats’ formula, not top’s—on a 128 GB Mac, top counts the file cache and sits near 100% all the time, which makes for a pretty useless gauge. Nothing needs root, so it installs as a regular LaunchAgent and never asks for a password.
The cube fetches that URL about once a second and draws it. Each cube remembers its own Wi-Fi network and metrics URL, so one firmware image works for every cube—you just point each one at a different Mac.
Step 1: run macmetrics on the Mac
./scripts/install-macmetrics.sh
curl -s http://127.0.0.1:9123/metrics   # sanity check
That installs the binary to ~/.local/bin/macmetrics and a LaunchAgent that starts at login and restarts if it crashes. It listens on port 9123 on all interfaces with no auth. The data is just utilization and temperatures, but still—don’t port-forward it to the internet.
All the code—macmetrics, the firmware, and the scripts below—is on GitHub at NSEvent/smalltv-mac-monitor. It’s free to read, build, and use for personal projects.
Step 2: get the firmware
The easy way is to download smalltv-mac-firmware.bin from the latest release. If you’d rather build it yourself, it’s one command:
make firmwareThat uses PlatformIO. The important detail is a size gate: the build fails if the image is 500,000 bytes or larger. Here’s why that matters.
Step 3: flash it over Wi-Fi (no soldering)
This was the part I expected to be painful. The cube’s USB-C port only supplies power—there’s no USB-serial chip, so esptool has nothing to talk to without opening the case and wiring up a UART adapter.
But the Ultra’s stock firmware has a web updater at /update, and it keeps a fairly small OTA slot. The official GeekMagic image is 505,200 bytes and fits; a ~694 KB image gets rejected with “Not Enough Space.” So I kept my firmware under 500 KB, and that tiny constraint unlocked the whole project. It uploads the same way the official update does—and the official image can be uploaded right back if you want stock again.
-
On a new cube, join its setup network
GIFTV(open, no password) and openhttp://192.168.4.1. If it’s already on your Wi-Fi, use its LAN address instead. -
Upload the firmware at
/update, or from the terminal:curl -f -F "firmware=@firmware.bin" http://192.168.4.1/update -
The cube reboots and opens its own setup network,
SmallTV-Mac. Join it, openhttp://192.168.4.1, and fill in your 2.4 GHz Wi-Fi name and password, the metrics URL (for examplehttp://MacBook-Pro.local:9123/metrics), and a hostname if you have more than one cube. -
It reboots onto your Wi-Fi, and the numbers start showing up.
.local names work, which surprised me a bit—the ESP8266 core doesn’t have a hostname lookup helper for mDNS, so the firmware sends its own mDNS query for anything ending in .local. In practice, though, I gave each Mac and cube a reserved IP in my router, because a dashboard that depends on name resolution is a dashboard that sometimes says WAIT for no obvious reason.
Later updates are the same /update upload, and a generic image keeps each cube’s saved settings.
Optional shortcut: if you’d rather not deal with the setup network at all, you can put your Wi-Fi details into a little text file instead. Copy cube.conf.example to cube.conf, type in your network name, password, and your Mac’s metrics URL, then run:
python3 scripts/configure-bin.py cube.conf smalltv-mac-firmware.binThat writes a copy of the firmware with your settings filled in—no compiler needed. Flash that one instead, and the cube joins your Wi-Fi on its first boot. Just don’t share that file, since your Wi-Fi password is inside it.
What’s on the screen
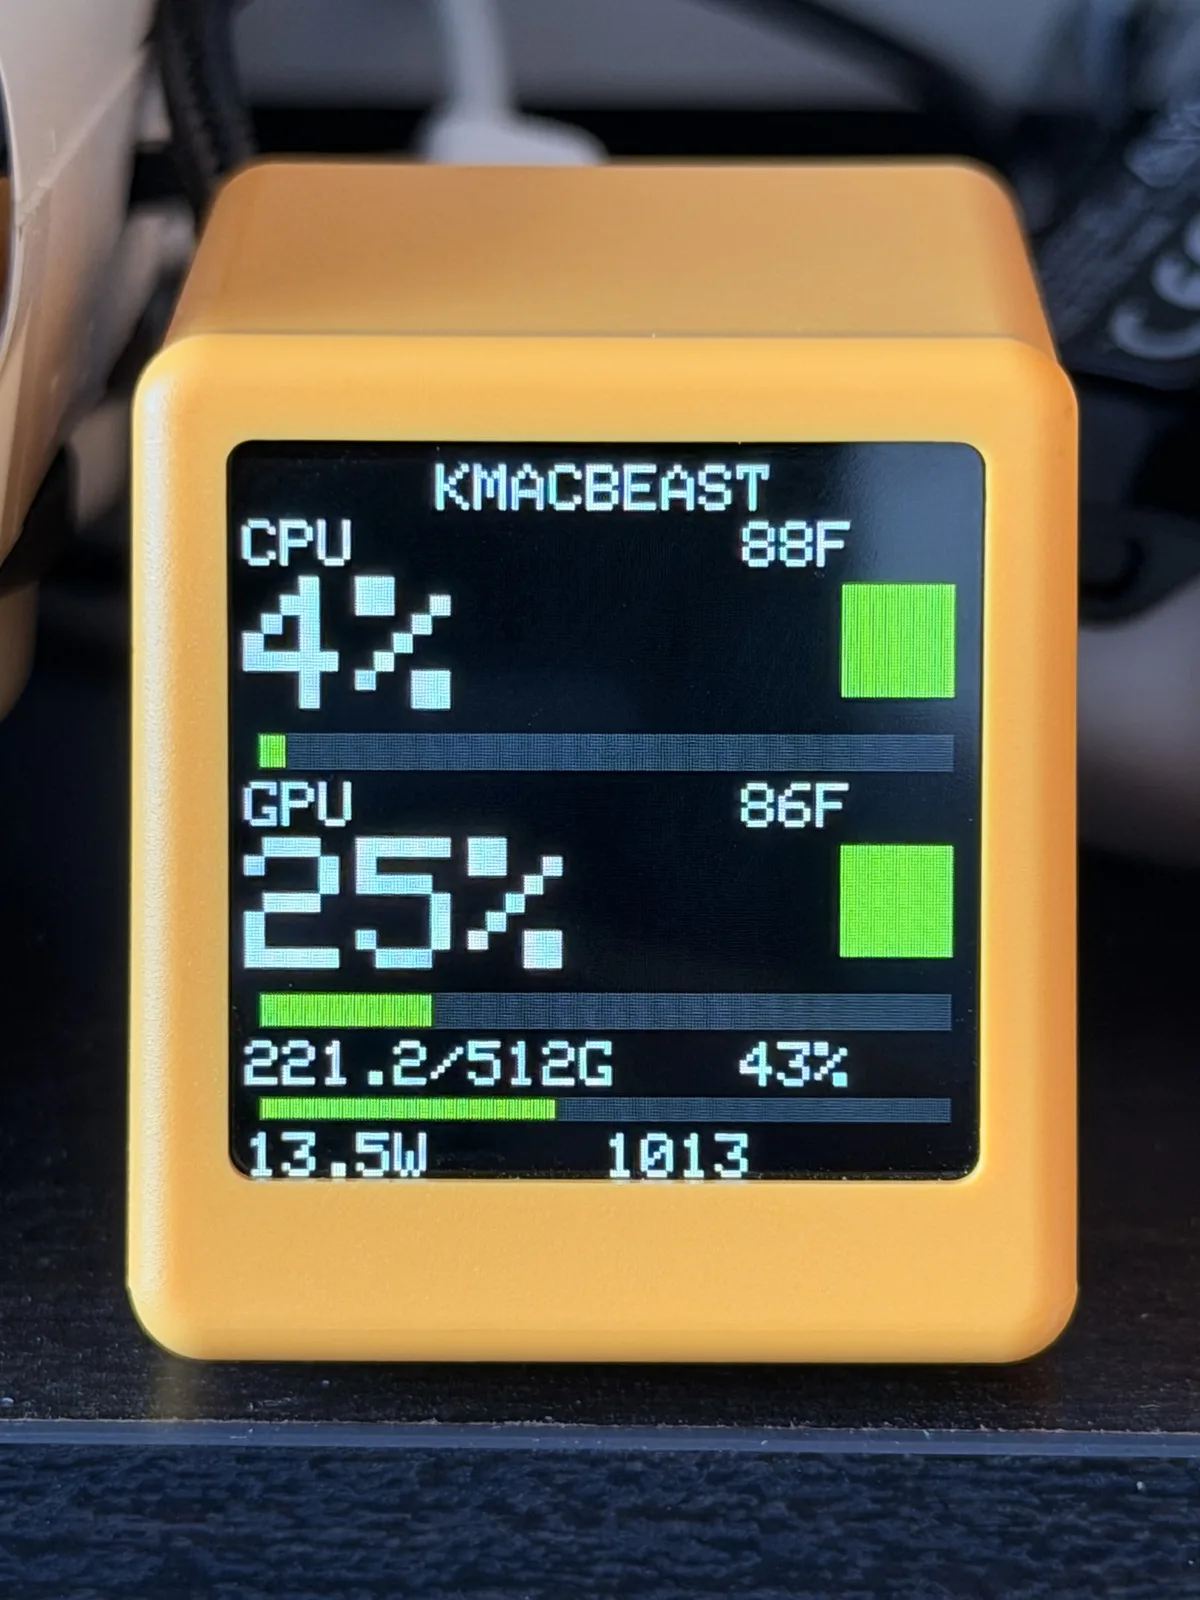 Green squares mean everything is cool. The bars under CPU, GPU, and memory fill as load goes up.
Computer name at the top, then CPU percent and temperature, GPU percent and temperature, memory used/total, watts, and fan RPM. CPU, GPU, and memory get bars. On the right, two big colored squares show the CPU and GPU temperature ranges at a glance: green under 60 °C, yellow under 75, orange under 90, red above that. The Mac sends Celsius and the cube converts to Fahrenheit for the numbers, because that’s what my brain reads. If yours reads Celsius, set Temperature units to C on the cube’s settings page (or add UNITS=C to cube.conf).
I tried a few fancier layouts—an amber “terminal” look, and one with little scrolling history traces for each metric. They looked cool in mockups, but I went back to the squares after a few days. From across the room I don’t need a 24-second chart—I need to know whether the box is green or red.
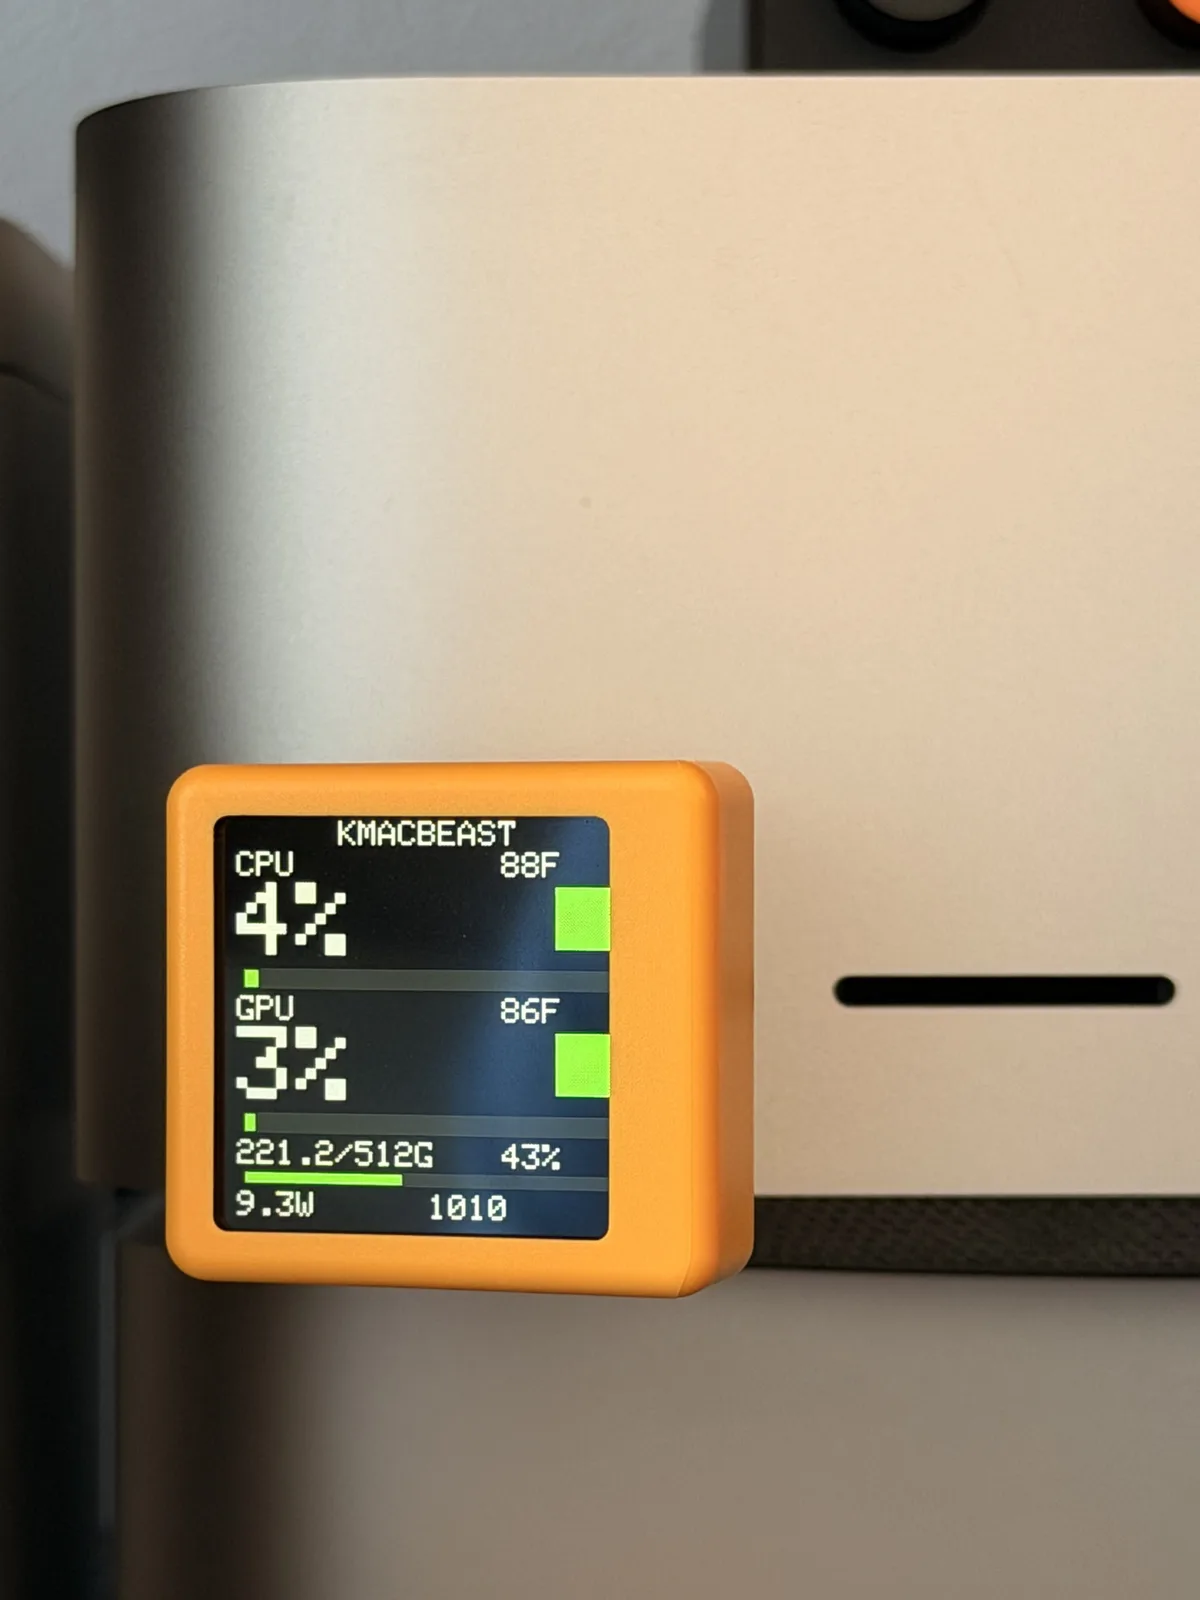 No cable: the cube plugs straight into the Mac Studio’s front USB-C port.
My favorite setup is the one in that photo. The cube has a USB-C port for power, and so does the front of a Mac Studio, so I got the shortest male-to-male USB-C adapter I could find ($2.25 on AliExpress, or $5.59 on Amazon, as of October 2026) and plugged the cube straight into the Mac. The Mac powers its own monitor, there’s no cable to route, and it looks like it came that way.
Plugged in like that, the cube is turned on its side, so the picture comes out sideways. That’s what the rotation setting is for. Open the cube’s settings page (http://<cube-ip>/), set Rotation to 1, and hit save. Each step turns the picture another 90° clockwise, so 1 is a quarter turn clockwise—that’s what mine uses on the front of the Mac Studio. If yours comes out upside down instead, use 3. It reboots and the screen comes back the right way up. If you’re preconfiguring with cube.conf, put the same number in ROTATION=. You can also do it from the terminal:
curl --data-urlencode 'rot=1' http://<cube-ip>/saveThe banner at the top also tells you when the data isn’t live:
| Banner | Meaning |
|---|---|
| computer name | got fresh data in the last 2.5 seconds |
| STALE | on Wi-Fi, but the data is old; numbers stay, drawn dim |
| OFFLINE | no Wi-Fi and nothing received |
| WAIT | on Wi-Fi with a URL set, but no sample yet |
| SETUP | no Wi-Fi or no URL configured |
Things that bit me
- The STALE wedge. Early on, a cube would sometimes sit on STALE until I power-cycled it. The ESP8266 kept reporting Wi-Fi as connected while packets had quietly stopped, and the light-sleep power mode made it worse. I switched to modem sleep, and now the cube rejoins Wi-Fi after about 12 seconds without data and reboots itself after about 60.
- Flicker. The first version erased each number before drawing the new one, so the screen blinked every second. Now it streams each finished row of pixels in one go, and nothing gets erased first.
- Macs change IP addresses. One of my Mac Studios moved from Ethernet to Wi-Fi and got a new address, and its cube went stale. Each cube now has a fallback URL: if the main one fails, it switches over, and every 30 seconds it checks whether the main one is back.
- Dim is a feature. The backlight is absurdly bright at full power, and the back of the cube gets uncomfortably hot to the touch, so I scaled the brightness slider down. Brightness 30 is plenty on a desk and keeps it cool.
Going back to stock
If you change your mind, upload the official FW-Smalltv-Ultra-V9.0.50.bin from GeekMagic’s GitHub through the same /update page. That works because the custom image went into the original slot. (I accidentally tested this while writing the post, when I flashed one of mine back to factory. It worked fine, and then I put the stats display right back on.) If something goes really wrong, the fallback is opening the case and using the UART pads with esptool, which is why it’s worth keeping a full flash dump if you’re the cautious type.
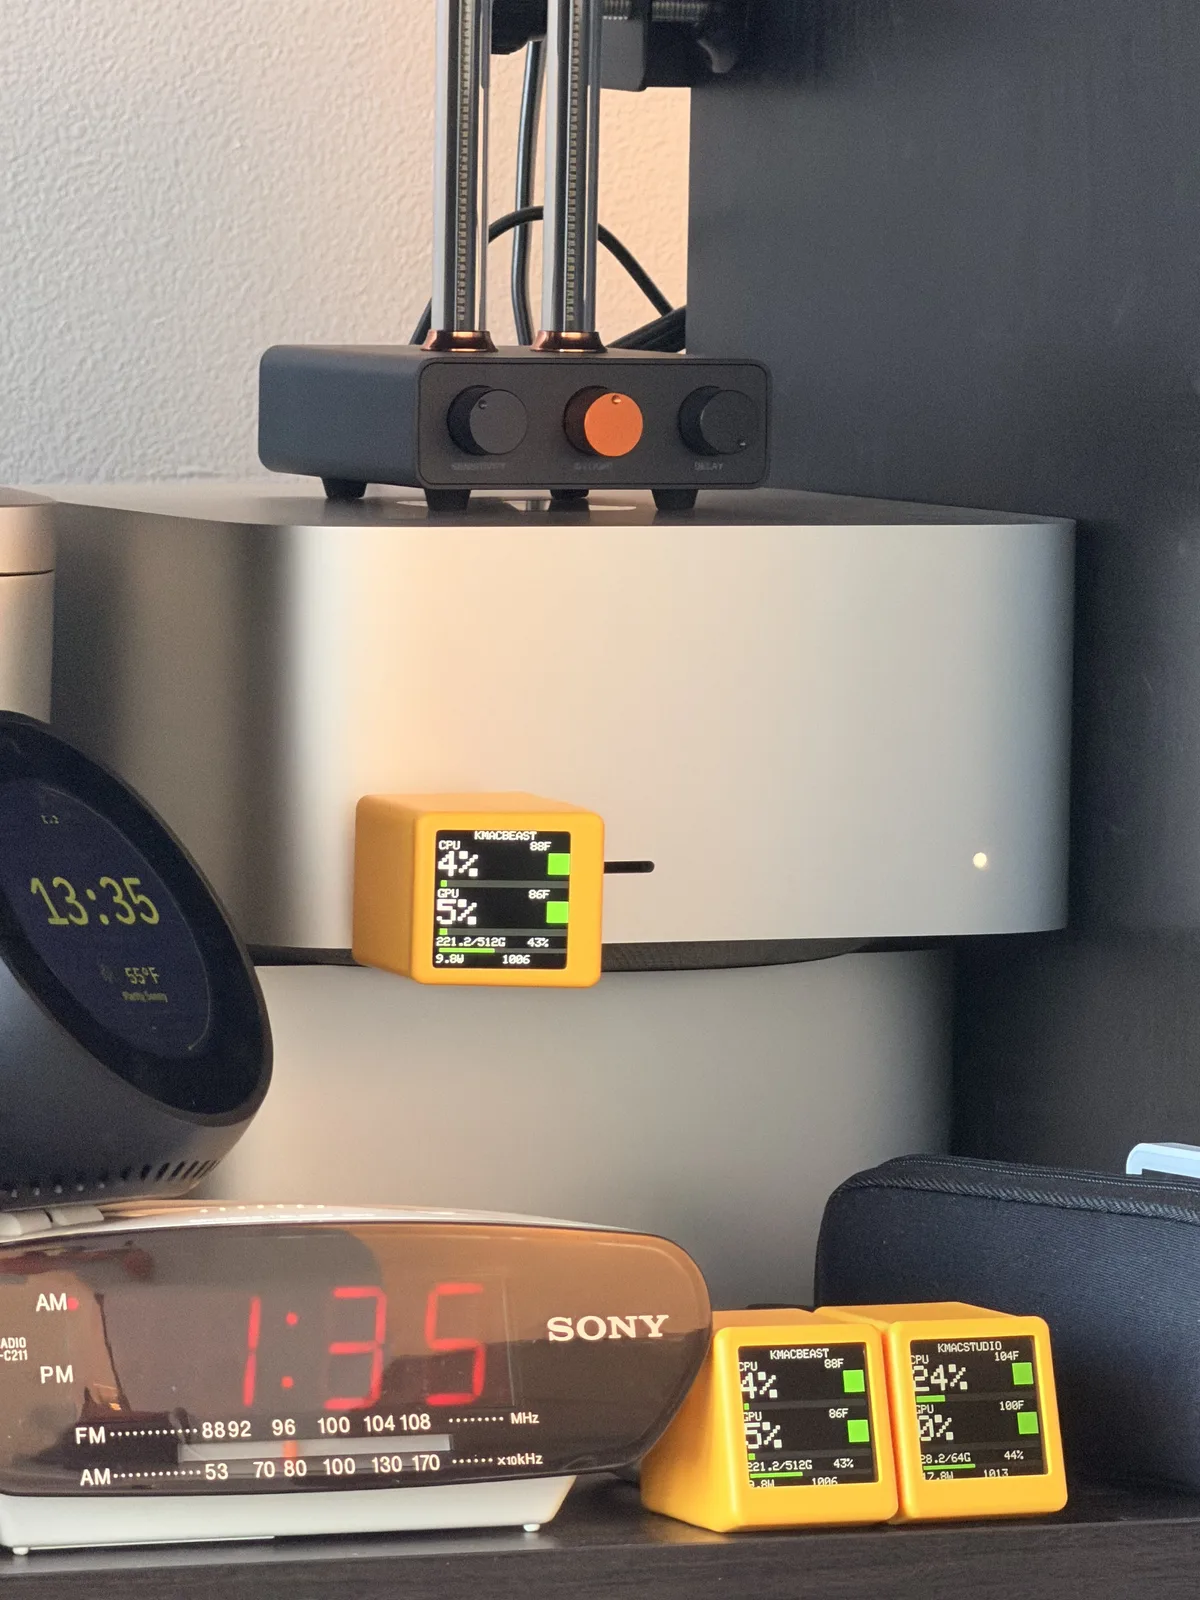 They fit in pretty well with the other little glowing clocks on my shelf.
I glance at these cubes way more than I expected to. When an agent is grinding away on Beast, I can tell from across the room whether it’s actually working or just sitting there, without opening Parsec or SSHing in. For about $10 and ten minutes of flashing, it’s one of the better upgrades I’ve made to my setup. Everything is on GitHub, so if you build one for your own Mac, send me a photo—I’d love to see where yours ends up.
The AliExpress and Amazon links in this post are affiliate links, so I may earn a small commission if you buy through them. As an Amazon Associate I earn from qualifying purchases.

*One cube per Mac Studio: Beast on the left, my other Studio on the right.*
**TL;DR:** The GeekMagic SmallTV-Ultra is a cheap 240×240 desk cube with an ESP8266 inside. I wrote a tiny Mac daemon that serves CPU, GPU, memory, temperatures, power, and fan speed as JSON, plus custom firmware that fits in the cube's stock update slot. You upload it through the cube's own web page, so you don't need to open the case or solder anything. Now each of my Macs has a little glowing dashboard next to it.
I have two Mac Studios doing real work—one I call Beast, and the other just goes by kMacStudio. Both run headless, with no monitor attached, so there's no casual way to see whether they're busy or whether a job is even still running. I kept opening Activity Monitor over Screen Sharing just to check whether something was pegged. That's a silly amount of effort to answer "is it working right now?"
I'd already built [Semaphore](/my-pcb-has-a-compiler.md), a custom USB-C board with LED status lights, but that only solves part of the problem. It's good at telling me when a process or agent changes state. It can't show me the running numbers—CPU, GPU, memory, power—which often tell me something different, like whether a job that says it's working is actually doing anything. I wanted a glanceable thing on my desk, the way a car has a temperature gauge instead of a diagnostics menu.

*Semaphore up top shows state changes; the cube underneath shows what the machine is actually doing.*
The SmallTV-Ultra turned out to be almost exactly the right object. It's a little cube with a 1.54-inch IPS screen, a USB-C cable for power, and Wi-Fi. Out of the box it shows weather, a clock, and GIFs. It's also, underneath, just an ESP-12F (ESP8266, 4 MB flash) driving an ST7789 panel—which means it's hackable.
## Where to get one
I bought mine on AliExpress for around $10 each. Right now the [GeekMagic SmallTV-Ultra](/go/smalltv-ultra) is $13.32 on sale (as of October 2026), so watch for a deal. If you'd rather skip the AliExpress shipping wait, there's [one on Amazon](https://www.amazon.com/dp/B0FCXV2H6J?tag=kevindotmd0a-20) for $18.99. It's listed under a generic brand and looks identical, but I haven't bought that one myself, so check that it's the Ultra. A few things to check before you buy:
- Get the **Ultra**, not the "Pro" (the Pro is a different chip). The original non-Ultra SmallTV is the same board, but I've only tested the Ultra.
- Mine shipped with stock firmware **Ultra-V9.0.50**. The flashing approach below relies on the Ultra's built-in web updater.
- It only does **2.4 GHz Wi-Fi**. The ESP8266 has no 5 GHz radio, so if your router splits bands, the cube has to join the 2.4 GHz one.
## How it works
There are two pieces:
```
Mac macmetrics → http://<mac>:9123/metrics (LaunchAgent, no root)
^
| plain HTTP, about once a second
Cube ESP8266 firmware → draws the dashboard
```
On the Mac, `macmetrics` is a small daemon that answers `GET /metrics` with compact JSON:
```json
{
"name": "MacBook Pro",
"host": "macbook-pro.local",
"cpu": 23.8,
"gpu": 26.0,
"memory_used_gb": 93.3,
"memory_total_gb": 128.0,
"cpu_temp_c": 74.4,
"gpu_temp_c": 65.2,
"fan_rpm": 1915,
"power_w": 47.3,
"timestamp": 1790314037
}
```
I modeled the numbers on [Stats](https://github.com/exelban/stats), because I already trusted it. CPU comes from the kernel's load counters, GPU from the IOAccelerator utilization key, and temperatures are averages of the same SMC sensor keys Stats uses for each chip generation. Power is the SMC system-total reading, and fan speed is the fastest fan. Memory uses Stats' formula, not `top`'s—on a 128 GB Mac, `top` counts the file cache and sits near 100% all the time, which makes for a pretty useless gauge. Nothing needs root, so it installs as a regular LaunchAgent and never asks for a password.
The cube fetches that URL about once a second and draws it. Each cube remembers its own Wi-Fi network and metrics URL, so one firmware image works for every cube—you just point each one at a different Mac.
## Step 1: run macmetrics on the Mac
```bash
./scripts/install-macmetrics.sh
curl -s http://127.0.0.1:9123/metrics # sanity check
```
That installs the binary to `~/.local/bin/macmetrics` and a LaunchAgent that starts at login and restarts if it crashes. It listens on port 9123 on all interfaces with no auth. The data is just utilization and temperatures, but still—don't port-forward it to the internet.
All the code—`macmetrics`, the firmware, and the scripts below—is on GitHub at [NSEvent/smalltv-mac-monitor](https://github.com/NSEvent/smalltv-mac-monitor). It's free to read, build, and use for personal projects.
## Step 2: get the firmware
The easy way is to download `smalltv-mac-firmware.bin` from the [latest release](https://github.com/NSEvent/smalltv-mac-monitor/releases/latest). If you'd rather build it yourself, it's one command:
```bash
make firmware
```
That uses PlatformIO. The important detail is a size gate: the build **fails if the image is 500,000 bytes or larger.** Here's why that matters.
## Step 3: flash it over Wi-Fi (no soldering)
This was the part I expected to be painful. The cube's USB-C port only supplies power—there's no USB-serial chip, so `esptool` has nothing to talk to without opening the case and wiring up a UART adapter.
But the Ultra's stock firmware has a web updater at `/update`, and it keeps a fairly small OTA slot. The official GeekMagic image is 505,200 bytes and fits; a ~694 KB image gets rejected with "Not Enough Space." So I kept my firmware under 500 KB, and that tiny constraint unlocked the whole project. It uploads the same way the official update does—and the official image can be uploaded right back if you want stock again.
1. On a new cube, join its setup network **`GIFTV`** (open, no password) and open `http://192.168.4.1`. If it's already on your Wi-Fi, use its LAN address instead.
2. Upload the firmware at `/update`, or from the terminal:
```bash
curl -f -F "firmware=@firmware.bin" http://192.168.4.1/update
```
3. The cube reboots and opens its own setup network, **`SmallTV-Mac`**. Join it, open `http://192.168.4.1`, and fill in your 2.4 GHz Wi-Fi name and password, the metrics URL (for example `http://MacBook-Pro.local:9123/metrics`), and a hostname if you have more than one cube.
4. It reboots onto your Wi-Fi, and the numbers start showing up.
`.local` names work, which surprised me a bit—the ESP8266 core doesn't have a hostname lookup helper for mDNS, so the firmware sends its own mDNS query for anything ending in `.local`. In practice, though, I gave each Mac and cube a reserved IP in my router, because a dashboard that depends on name resolution is a dashboard that sometimes says WAIT for no obvious reason.
Later updates are the same `/update` upload, and a generic image keeps each cube's saved settings.
**Optional shortcut:** if you'd rather not deal with the setup network at all, you can put your Wi-Fi details into a little text file instead. Copy `cube.conf.example` to `cube.conf`, type in your network name, password, and your Mac's metrics URL, then run:
```bash
python3 scripts/configure-bin.py cube.conf smalltv-mac-firmware.bin
```
That writes a copy of the firmware with your settings filled in—no compiler needed. Flash that one instead, and the cube joins your Wi-Fi on its first boot. Just don't share that file, since your Wi-Fi password is inside it.
## What's on the screen

*Green squares mean everything is cool. The bars under CPU, GPU, and memory fill as load goes up.*
Computer name at the top, then CPU percent and temperature, GPU percent and temperature, memory used/total, watts, and fan RPM. CPU, GPU, and memory get bars. On the right, two big colored squares show the CPU and GPU temperature ranges at a glance: green under 60 °C, yellow under 75, orange under 90, red above that. The Mac sends Celsius and the cube converts to Fahrenheit for the numbers, because that's what my brain reads. If yours reads Celsius, set **Temperature units** to `C` on the cube's settings page (or add `UNITS=C` to `cube.conf`).
I tried a few fancier layouts—an amber "terminal" look, and one with little scrolling history traces for each metric. They looked cool in mockups, but I went back to the squares after a few days. From across the room I don't need a 24-second chart—I need to know whether the box is green or red.

*No cable: the cube plugs straight into the Mac Studio's front USB-C port.*
My favorite setup is the one in that photo. The cube has a USB-C port for power, and so does the front of a Mac Studio, so I got the shortest [male-to-male USB-C adapter](/go/usb-c-adapter) I could find ([$2.25 on AliExpress](/go/usb-c-adapter), or [$5.59 on Amazon](https://www.amazon.com/dp/B0H4XWLX1N?tag=kevindotmd0a-20), as of October 2026) and plugged the cube straight into the Mac. The Mac powers its own monitor, there's no cable to route, and it looks like it came that way.
Plugged in like that, the cube is turned on its side, so the picture comes out sideways. That's what the rotation setting is for. Open the cube's settings page (`http://<cube-ip>/`), set **Rotation** to 1, and hit save. Each step turns the picture another 90° clockwise, so 1 is a quarter turn clockwise—that's what mine uses on the front of the Mac Studio. If yours comes out upside down instead, use 3. It reboots and the screen comes back the right way up. If you're preconfiguring with `cube.conf`, put the same number in `ROTATION=`. You can also do it from the terminal:
```bash
curl --data-urlencode 'rot=1' http://<cube-ip>/save
```
The banner at the top also tells you when the data isn't live:
| Banner | Meaning |
| --- | --- |
| computer name | got fresh data in the last 2.5 seconds |
| STALE | on Wi-Fi, but the data is old; numbers stay, drawn dim |
| OFFLINE | no Wi-Fi and nothing received |
| WAIT | on Wi-Fi with a URL set, but no sample yet |
| SETUP | no Wi-Fi or no URL configured |
## Things that bit me
- **The STALE wedge.** Early on, a cube would sometimes sit on STALE until I power-cycled it. The ESP8266 kept reporting Wi-Fi as connected while packets had quietly stopped, and the light-sleep power mode made it worse. I switched to modem sleep, and now the cube rejoins Wi-Fi after about 12 seconds without data and reboots itself after about 60.
- **Flicker.** The first version erased each number before drawing the new one, so the screen blinked every second. Now it streams each finished row of pixels in one go, and nothing gets erased first.
- **Macs change IP addresses.** One of my Mac Studios moved from Ethernet to Wi-Fi and got a new address, and its cube went stale. Each cube now has a fallback URL: if the main one fails, it switches over, and every 30 seconds it checks whether the main one is back.
- **Dim is a feature.** The backlight is absurdly bright at full power, and the back of the cube gets uncomfortably hot to the touch, so I scaled the brightness slider down. Brightness 30 is plenty on a desk and keeps it cool.
## Going back to stock
If you change your mind, upload the official `FW-Smalltv-Ultra-V9.0.50.bin` from [GeekMagic's GitHub](https://github.com/GeekMagicClock/smalltv-ultra) through the same `/update` page. That works because the custom image went into the original slot. (I accidentally tested this while writing the post, when I flashed one of mine back to factory. It worked fine, and then I put the stats display right back on.) If something goes really wrong, the fallback is opening the case and using the UART pads with `esptool`, which is why it's worth keeping a full flash dump if you're the cautious type.

*They fit in pretty well with the other little glowing clocks on my shelf.*
I glance at these cubes way more than I expected to. When an agent is grinding away on Beast, I can tell from across the room whether it's actually working or just sitting there, without opening Parsec or SSHing in. For about $10 and ten minutes of flashing, it's one of the better upgrades I've made to my setup. Everything is on [GitHub](https://github.com/NSEvent/smalltv-mac-monitor), so if you build one for your own Mac, send me a photo—I'd love to see where yours ends up.
*The AliExpress and Amazon links in this post are affiliate links, so I may earn a small commission if you buy through them. As an Amazon Associate I earn from qualifying purchases.*