🙀 This Circuit Board Is a Watch
TL;DR: I designed Amber Dial, a wristwatch where a single 0.8 mm circuit board is the whole thing—case, dial and display. PCBWay fabricated and assembled it, and it arrived this week and kept time on the first try. My background is software, and the most circuits training I have is AP Physics. What I took away is that the gap between “I can write code” and “I can make a physical object” is a lot smaller than it was, and that a factory is the final test you can’t fake.
Disclosure: PCBWay sponsored this project with a credit toward fabrication and assembly. Links to PCBWay in this post use my referral link, and I earn a small commission if you sign up and order through it.
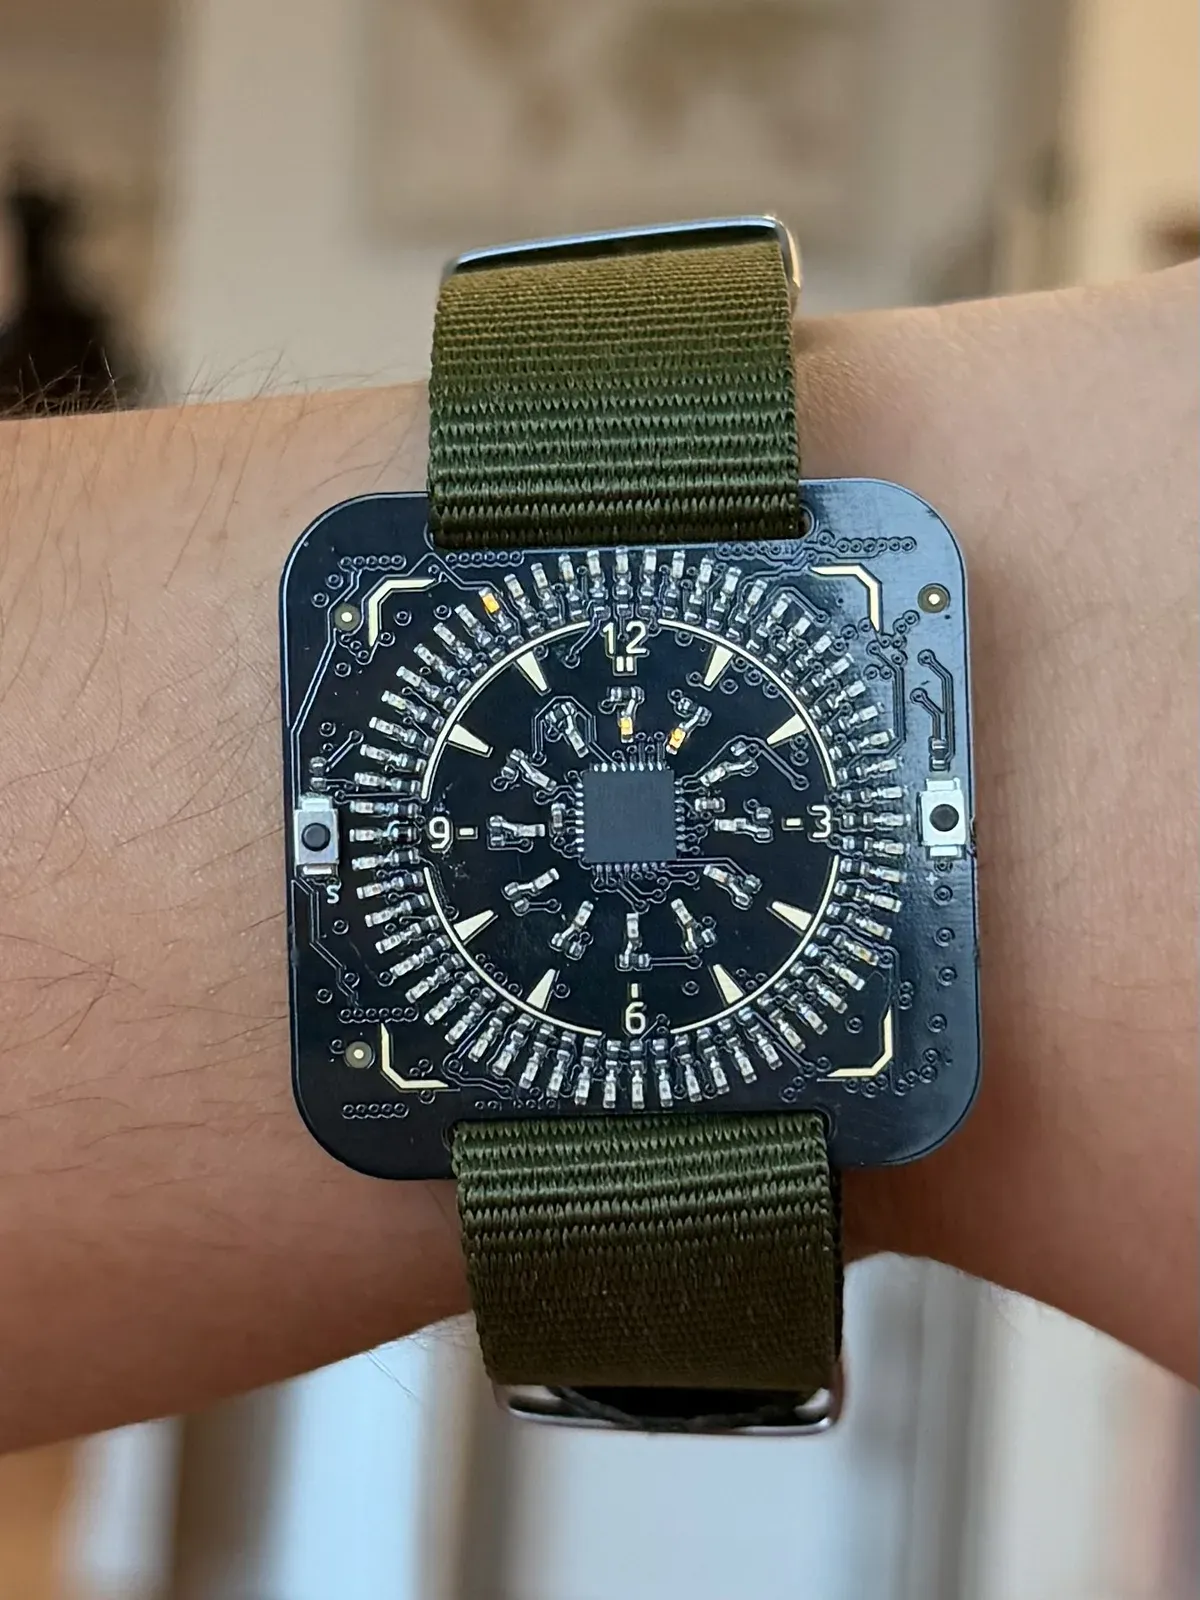
The real thing. There’s no case and no separate screen—the board is the watch.
The board is the whole watch
Most watches are a case with things inside it: a movement, a dial, hands, a crystal. Amber Dial has none of those. It’s a single circuit board, and the display is the board too. 60 LEDs in the outer ring show minutes and seconds, 12 in the inner ring show the hour, and you read it by position like a regular analog watch. The black solder mask is the dial, and the gold numerals and markers are the same gold plating that protects the board’s pads. A NATO strap threads through 2 slots cut into the board, and a CR2032 coin cell sits on the back.
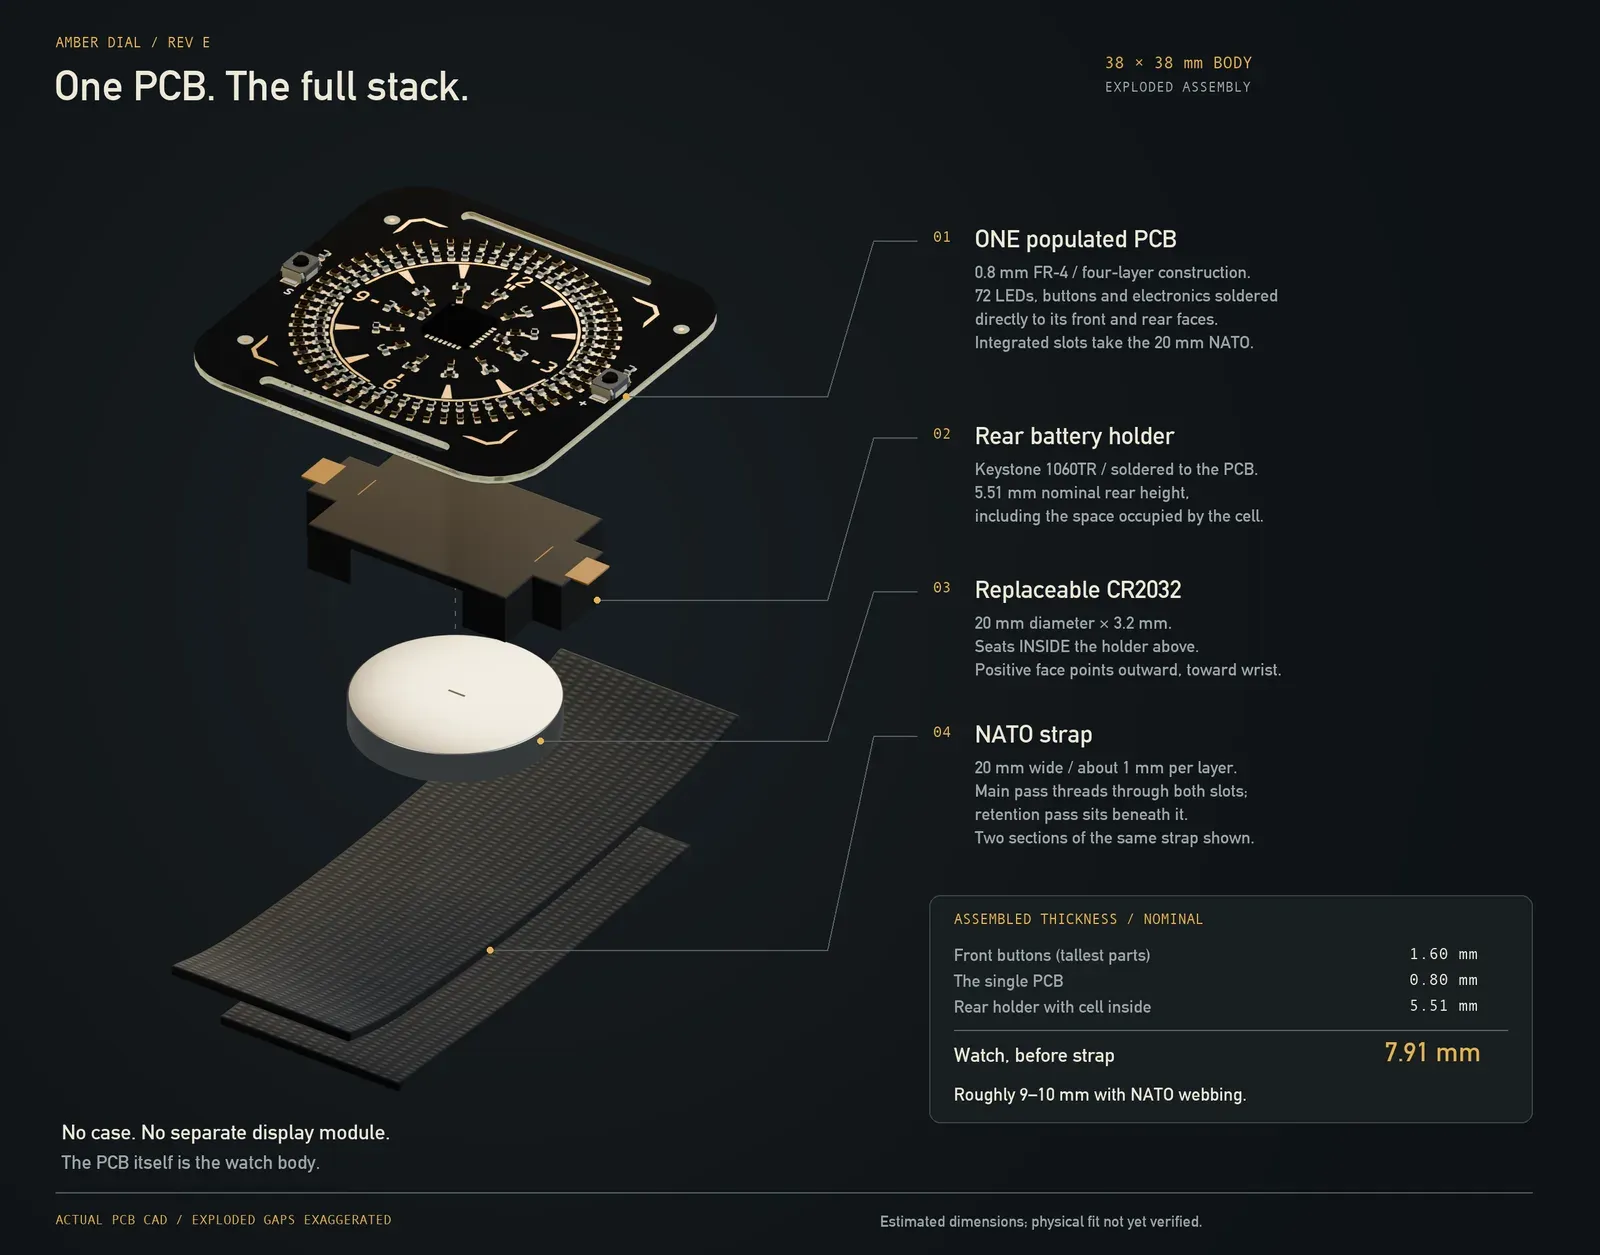
The whole stack, from my design renders: 1 populated board, a battery holder, a coin cell and a strap.
What surprised me most when I first held it is how flat it is. Every component is tiny and surface-mounted, so the tallest things on the board are the 2 buttons on the sides, and the strap where it loops through the slots sits higher than anything else. You can run a finger across the face and it just feels smooth. I’d assumed an uncased board on my wrist would feel fragile, and it doesn’t. I’m going to be careful with it anyway, and I’ll update this post as I find out how it holds up.
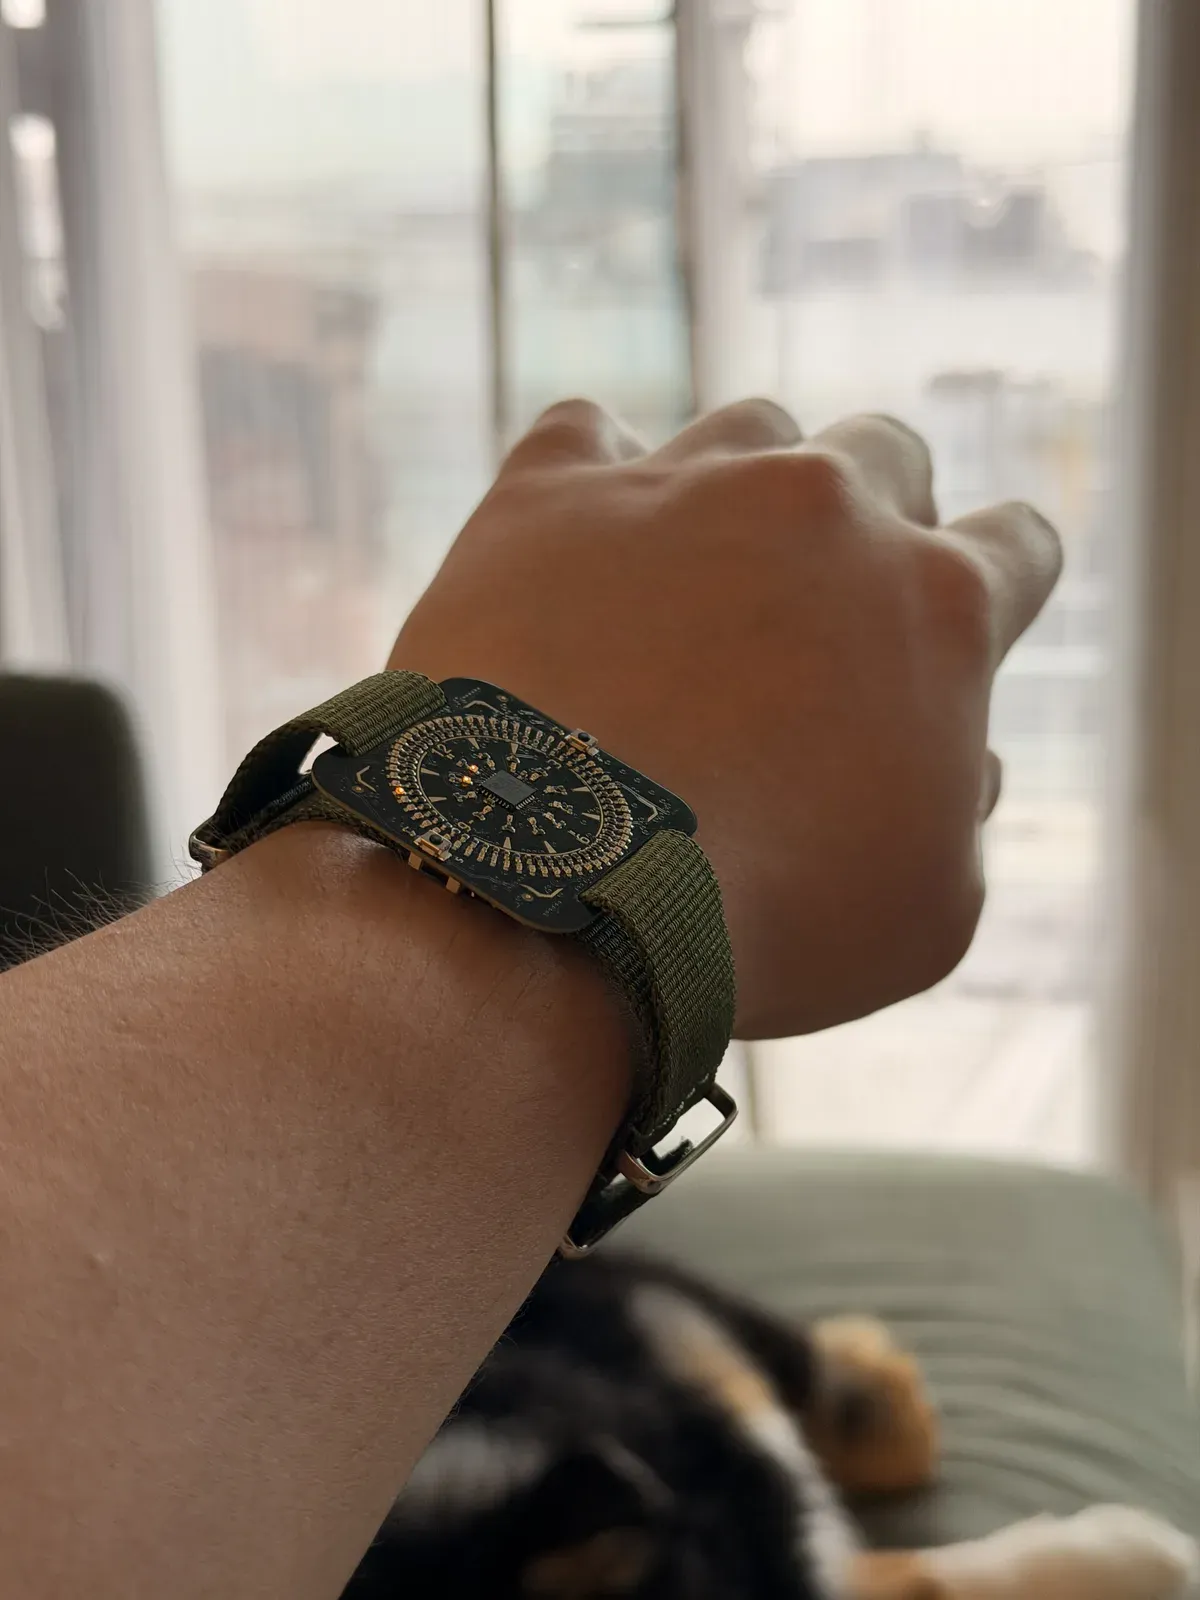
From the side. The whole watch is about 7.9 mm thick without the strap, and the coin cell holder on the back accounts for most of that.
I don’t really know how to do this
I have a computer science degree and years of experience as a software engineer. Software turns out to be a small part of a project like this. Most of it is hardware: circuits, component selection, PCB layout, power budgets, manufacturing files. My formal background there is AP Physics 1 and 2 and the physics classes I took in college. Before this year I had never designed a circuit board.
There are really 2 halves to that kind of knowledge. One is theory—how the parts behave and the equations behind them. The other is practical: using the design tools, knowing what a factory needs from you, knowing which mistakes are expensive. I had a little of the first and none of the second.
This is my third board this year. The first was Semaphore, a little USB-C status light. The second was a business card that lights up when you tap it. The watch is the most ambitious by far: 177 components on both sides of a 4-layer board, with a microcontroller, a real-time clock chip and 72 LEDs, all running for months on a coin cell.
What made it possible is AI. I’ve used AI almost every day for about 2 years now, going back to when Cursor was the new thing, so I’d call myself an advanced user. For this project I mostly just talked to it. I dictated the concept of a watch that reads like an analog dial but is made of light, then had the AI branch off in a bunch of different directions—different dial layouts, marker shapes, ways to show the hour—and kept picking the ones I liked and branching again from there. The design I ended up with is what that process converged on. It’s a combination of my taste and a lot of iteration, more than any one big idea.
The design is only half of it, though. The other half is everything around ordering: which fields to fill in on the order form, which files the factory needs, what to check before paying, and how to talk to a factory’s engineers about a board like this one. That’s the part I’d have expected to take years of getting burned to learn, and AI streamlined it a lot. I still made the decisions about what the watch should be, but I didn’t have to become an expert in the tools first.
So the watch is a reminder for me. It’s a physical object on my wrist that says the edge of what I can build has moved, and it moved this year.
The factory is the final test
Software has a comfortable property: you can run it and see. I can write tests, simulate, and check things a hundred ways. I did that for the watch too. The design passed every electrical and design-rule check, and I had a simulator for the buttons and the display. But none of that proves a physical watch will work.
The real test happened at a factory in Shenzhen. I designed the watch in my apartment, uploaded the files to PCBWay, and they made the boards, sourced the parts, assembled everything, programmed the chip and tested the LEDs and buttons. If anything in my design was wrong, that’s where it would show up. I wrote about this idea earlier—a PCB factory is less like a printer and more like a compiler that runs your design through its own process and sometimes asks you to approve the result.
What working with PCBWay was like
The ordering part was ordinary: upload the Gerbers, the parts list and the placement file, get a quote, pay. The interesting part was everything in between, and that’s where their customer service mattered.
A project like this needs a lot of back-and-forth. Some examples:
- Quantity. I first asked for 2 assembled watches, saw the parts quote and changed it to 1. They re-quoted the assembly for a single unit without fuss.
- Programming. My design expected a pogo-pin fixture to flash the firmware, and they didn’t have one for this board. So we agreed on 5 thin temporary wires soldered to the programming pads instead. They asked for detailed steps, so I made an illustrated guide showing exactly which pad gets which wire.
- Assembly check. Before finishing, they sent 8 close-up photos of the assembled board and asked me to confirm the orientation. Watch LEDs are tiny diodes, and one placed backwards just stays dark, so I asked them to double-check the LED polarity before approving. They confirmed it and we moved on.
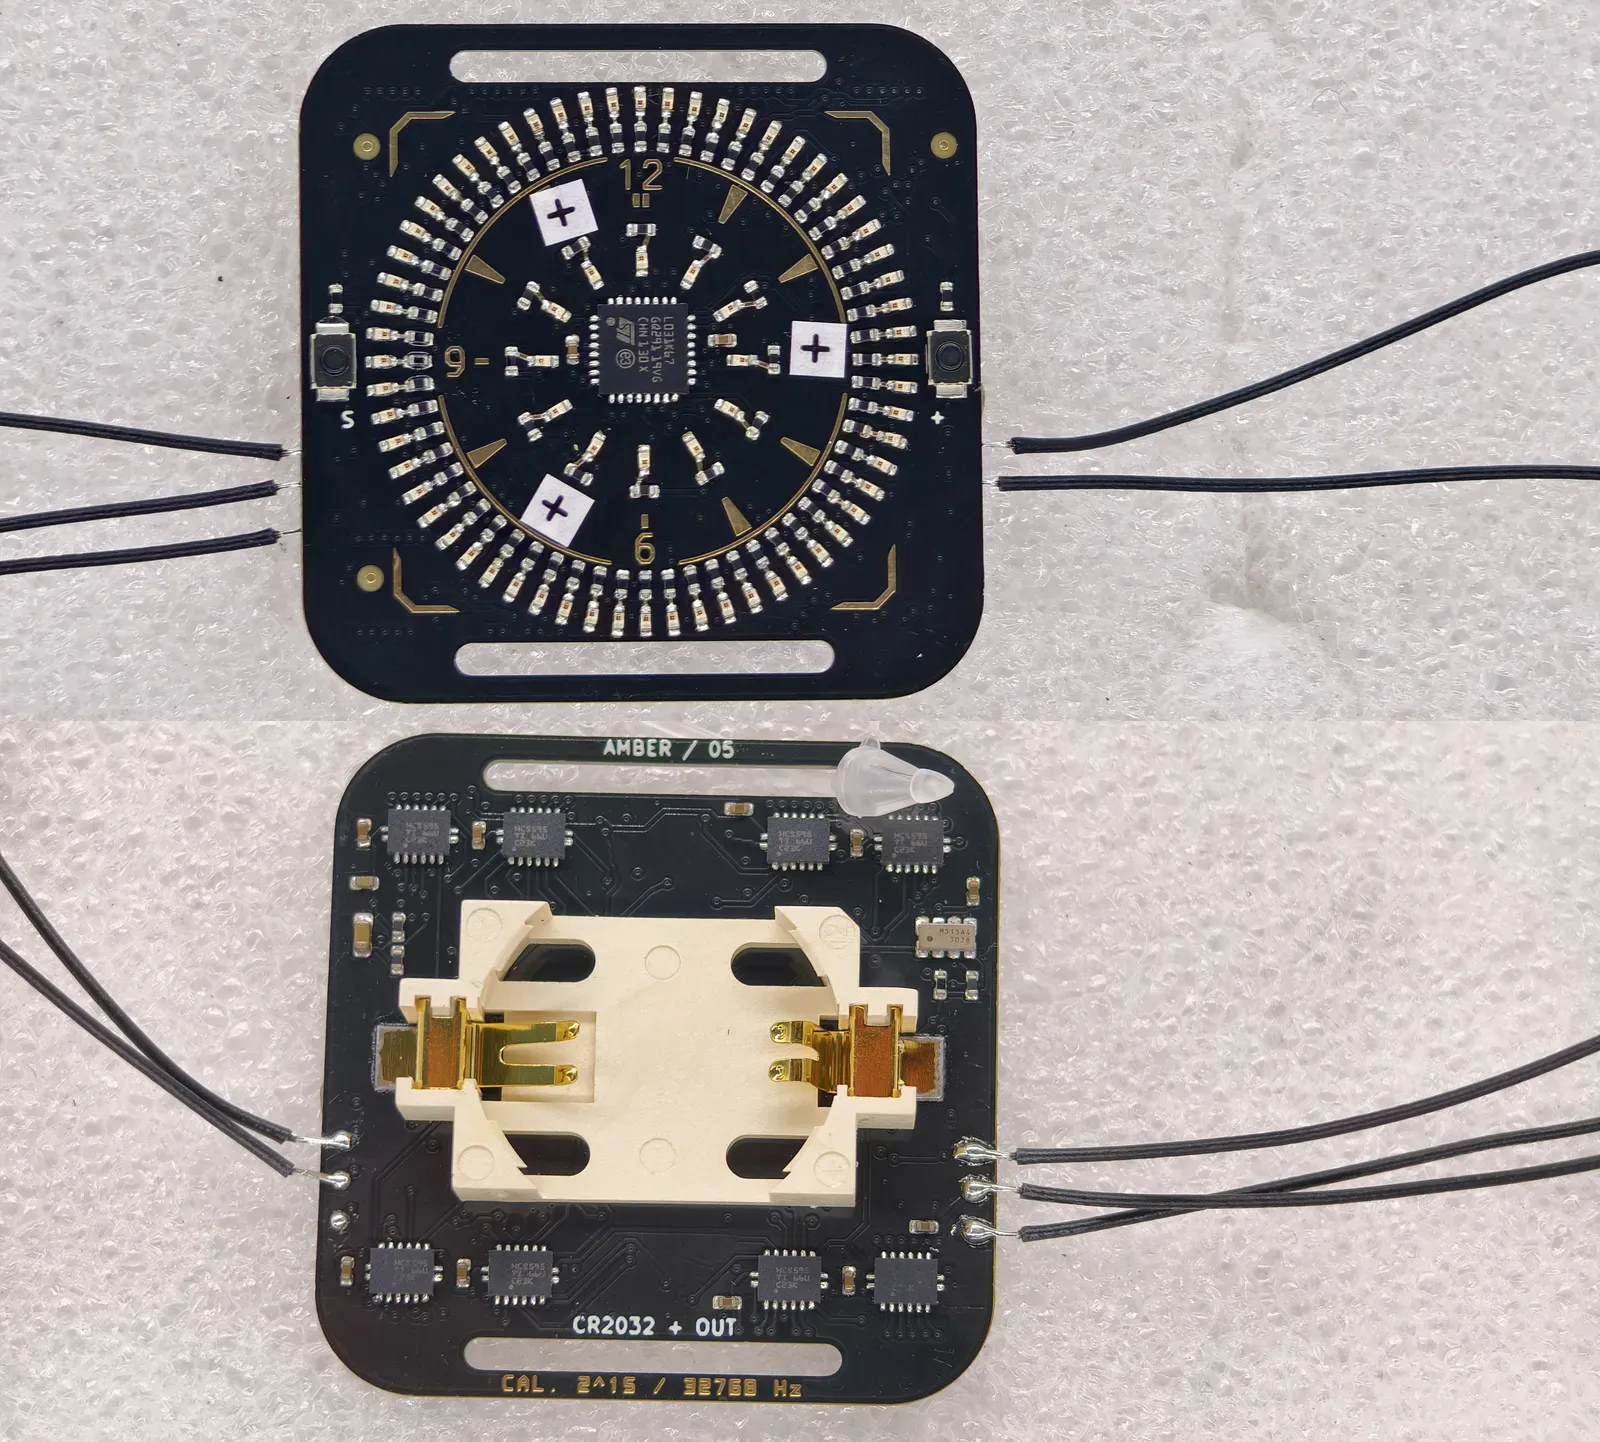
2 of the 8 photos PCBWay sent me to approve before testing: the front and the back, with the temporary programming wires attached.
None of these were problems exactly. They’re the questions that come up when the person building your design is careful. It felt more like working with an engineer on the other side of the world than ordering from a website.
As for the boards themselves, I honestly have nothing to complain about. The component placement looks very clean, the gold finish is smooth, and I couldn’t find a single defect. The thing I appreciated most was the edges. With boards I’ve ordered before, the edges came with leftover bits of the panel they were cut from, and I had to snap those off and sand the edges myself. These came already smooth, which matters a lot more when the board is sitting on your wrist.
AI helped a lot with the communication. For the programming guide, I sent an English version as the ground truth along with a Chinese translation, so the technicians could read it in their own language and still check anything ambiguous against the original. I did the same with the assembly reference drawing. It’s a small thing, but I think it cut out a whole round of clarifying emails.
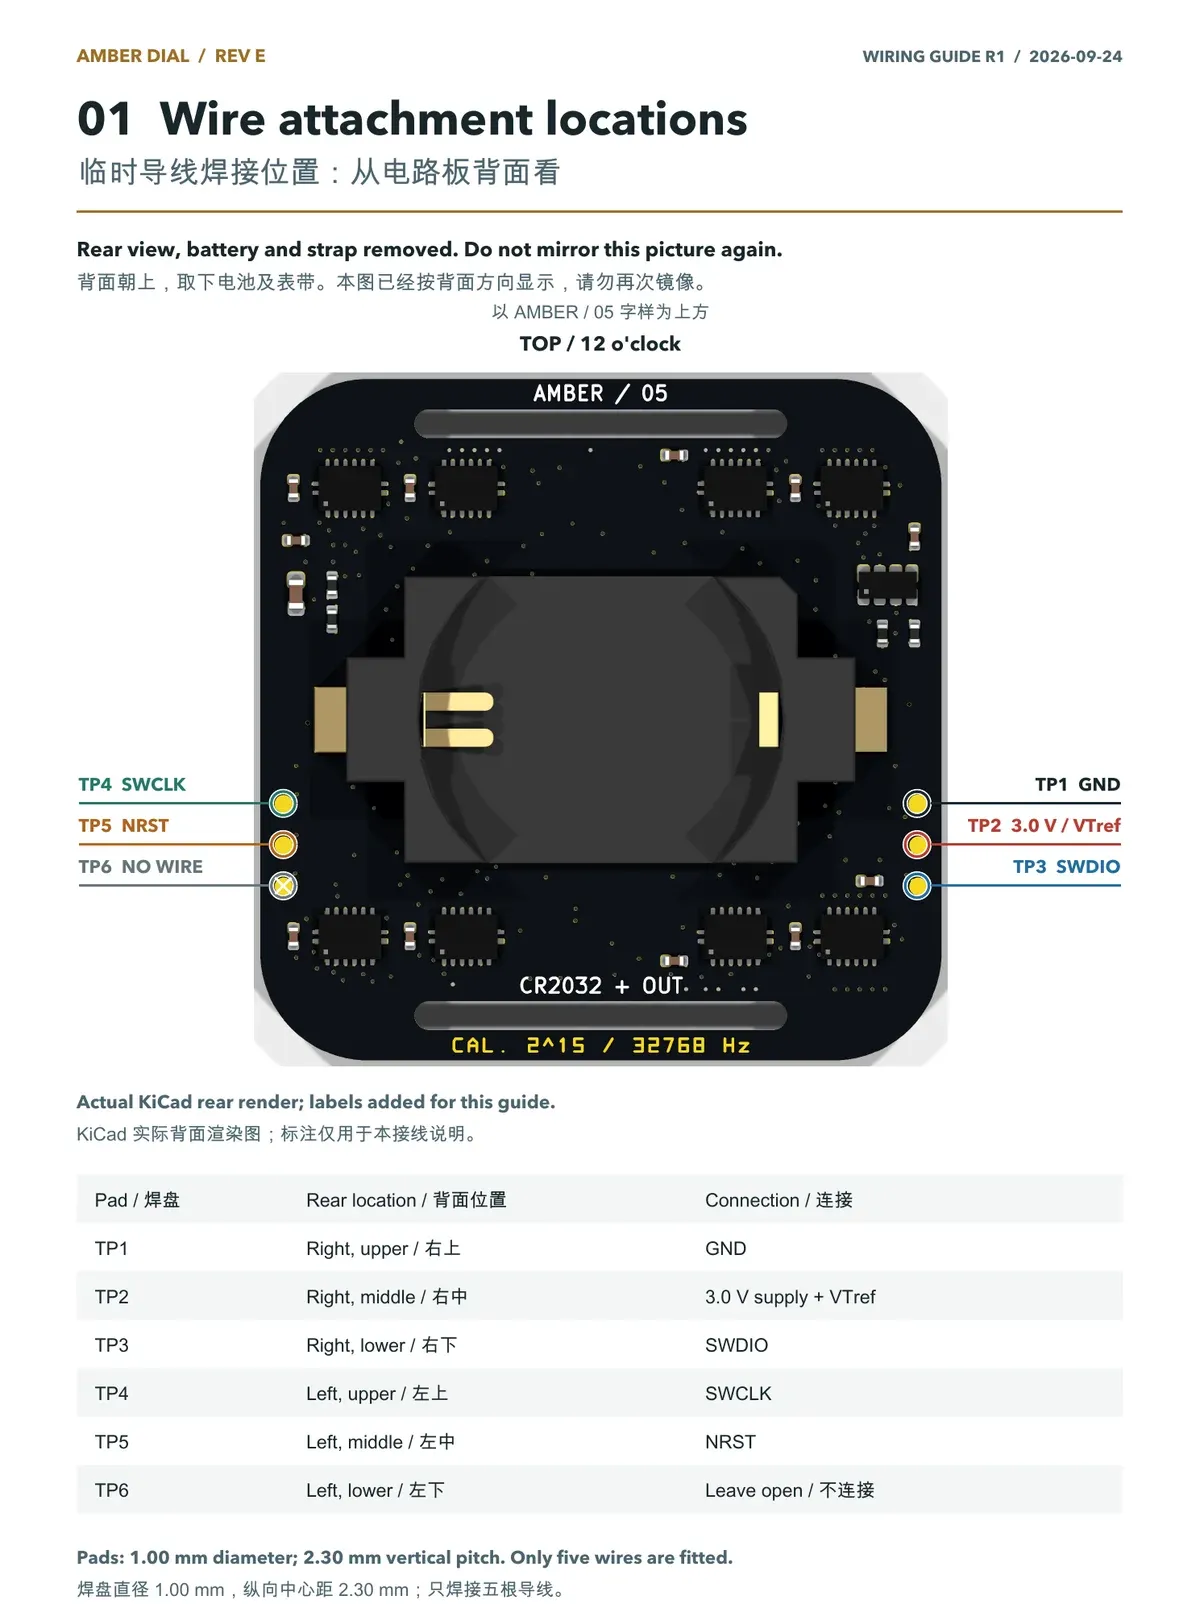
Page 1 of the guide I sent PCBWay. Every instruction is in English with the Chinese right under it.
The timeline: I paid on September 29, and the watch arrived on November 6—about 5.5 weeks, including the photo review.
Here’s what it cost, since I always want to know this when I read these posts:
| What | Cost |
|---|---|
| 5 bare PCBs (4-layer, 0.8 mm, gold finish) | $57.43 |
| Components for 1 watch | $73.59 |
| Assembly, including programming and testing | $105.07 |
| Economy shipping | $35.00 |
| Total | $271.09 |
PCBWay’s sponsorship covered $200, and a $5 new-customer coupon took off a little more, so I paid about $66 plus a payment handling fee. 1 assembled prototype is the most expensive way to buy anything—the assembly setup costs about the same whether you make 1 watch or 20—so the per-watch price would drop a lot at a bigger quantity.
Unboxing (and a small panic)
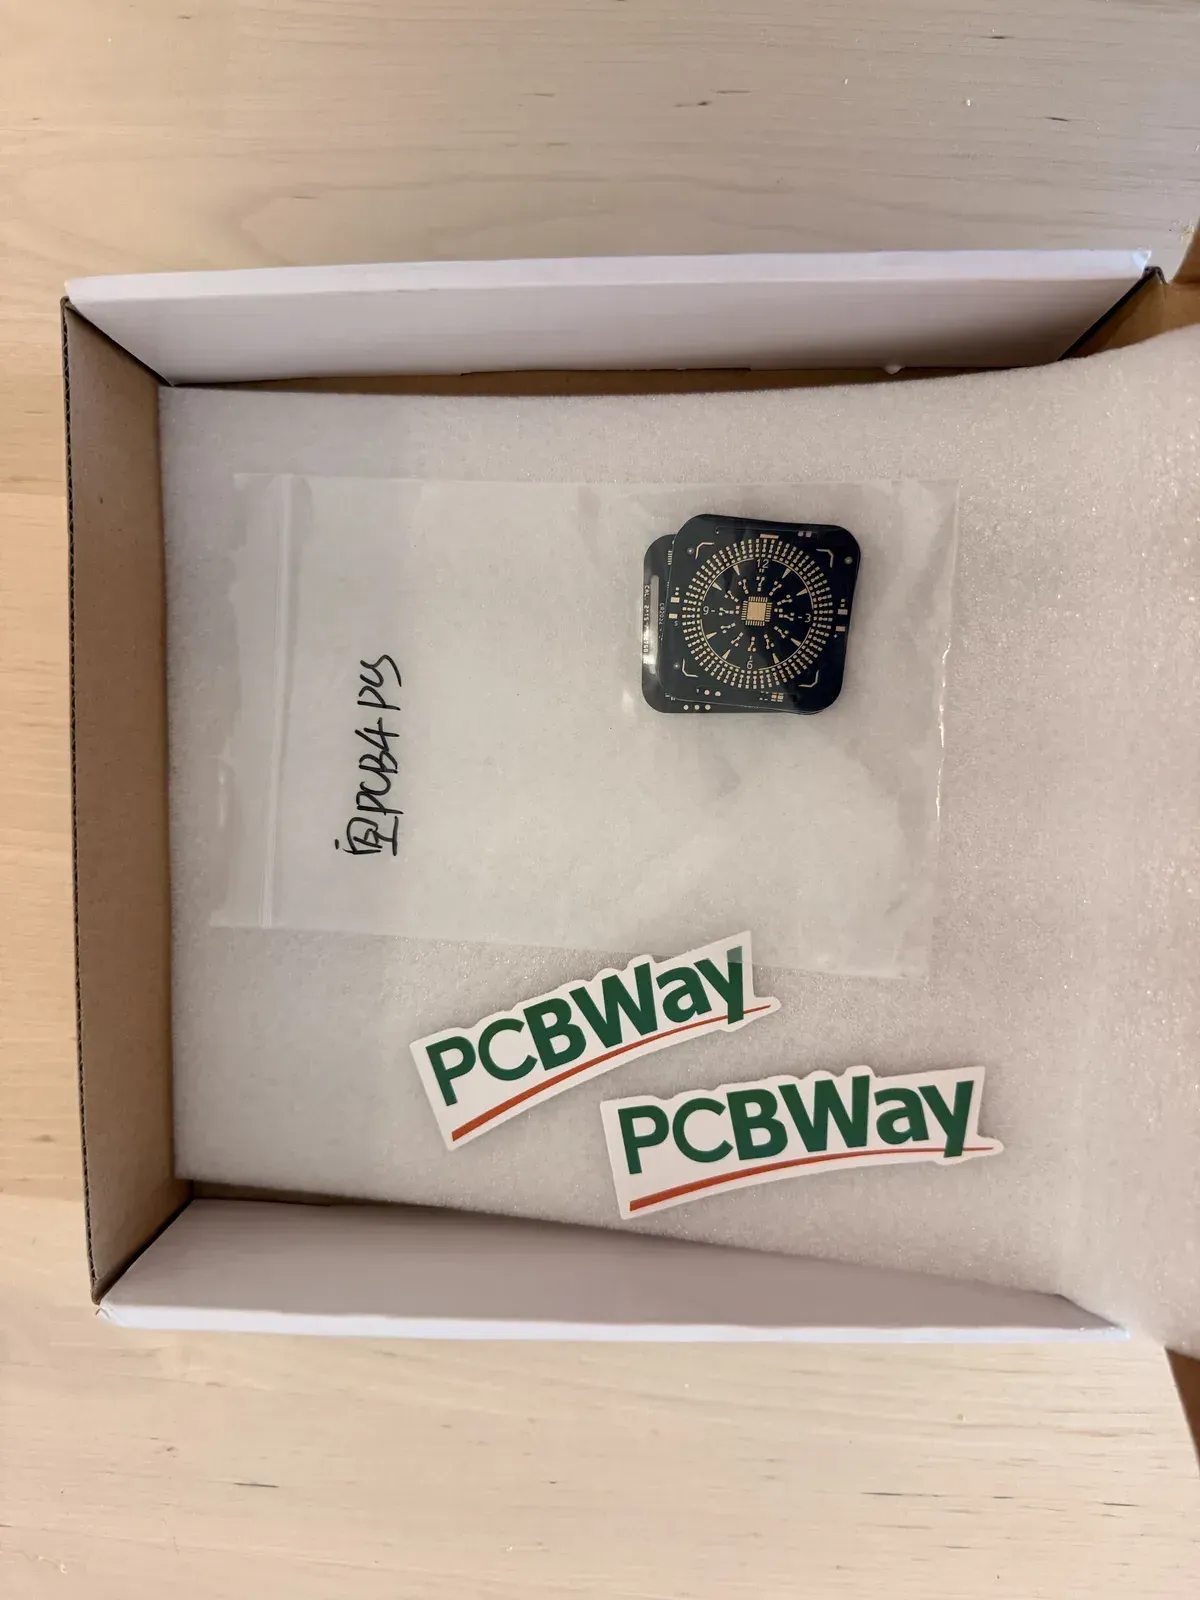
The assembled watch came in its own bag, labeled “PCBA.” I found the bare spares first.
When I opened the package, the first boards I found were completely bare—just the printed outlines of every part. The chip in the middle was a picture of a chip, and there was no battery holder on the back. For a minute I thought the assembly had gone missing. Then I found the real watch wrapped separately. I’d ordered 5 bare boards and 1 assembled, so the 4 blanks were exactly what I paid for. I just hadn’t thought about what a bare spare would look like.
The assembled watch still had the 5 programming wires attached to the back, which I’ll remove with a soldering iron rather than rip off (the pads are only 1 mm across).
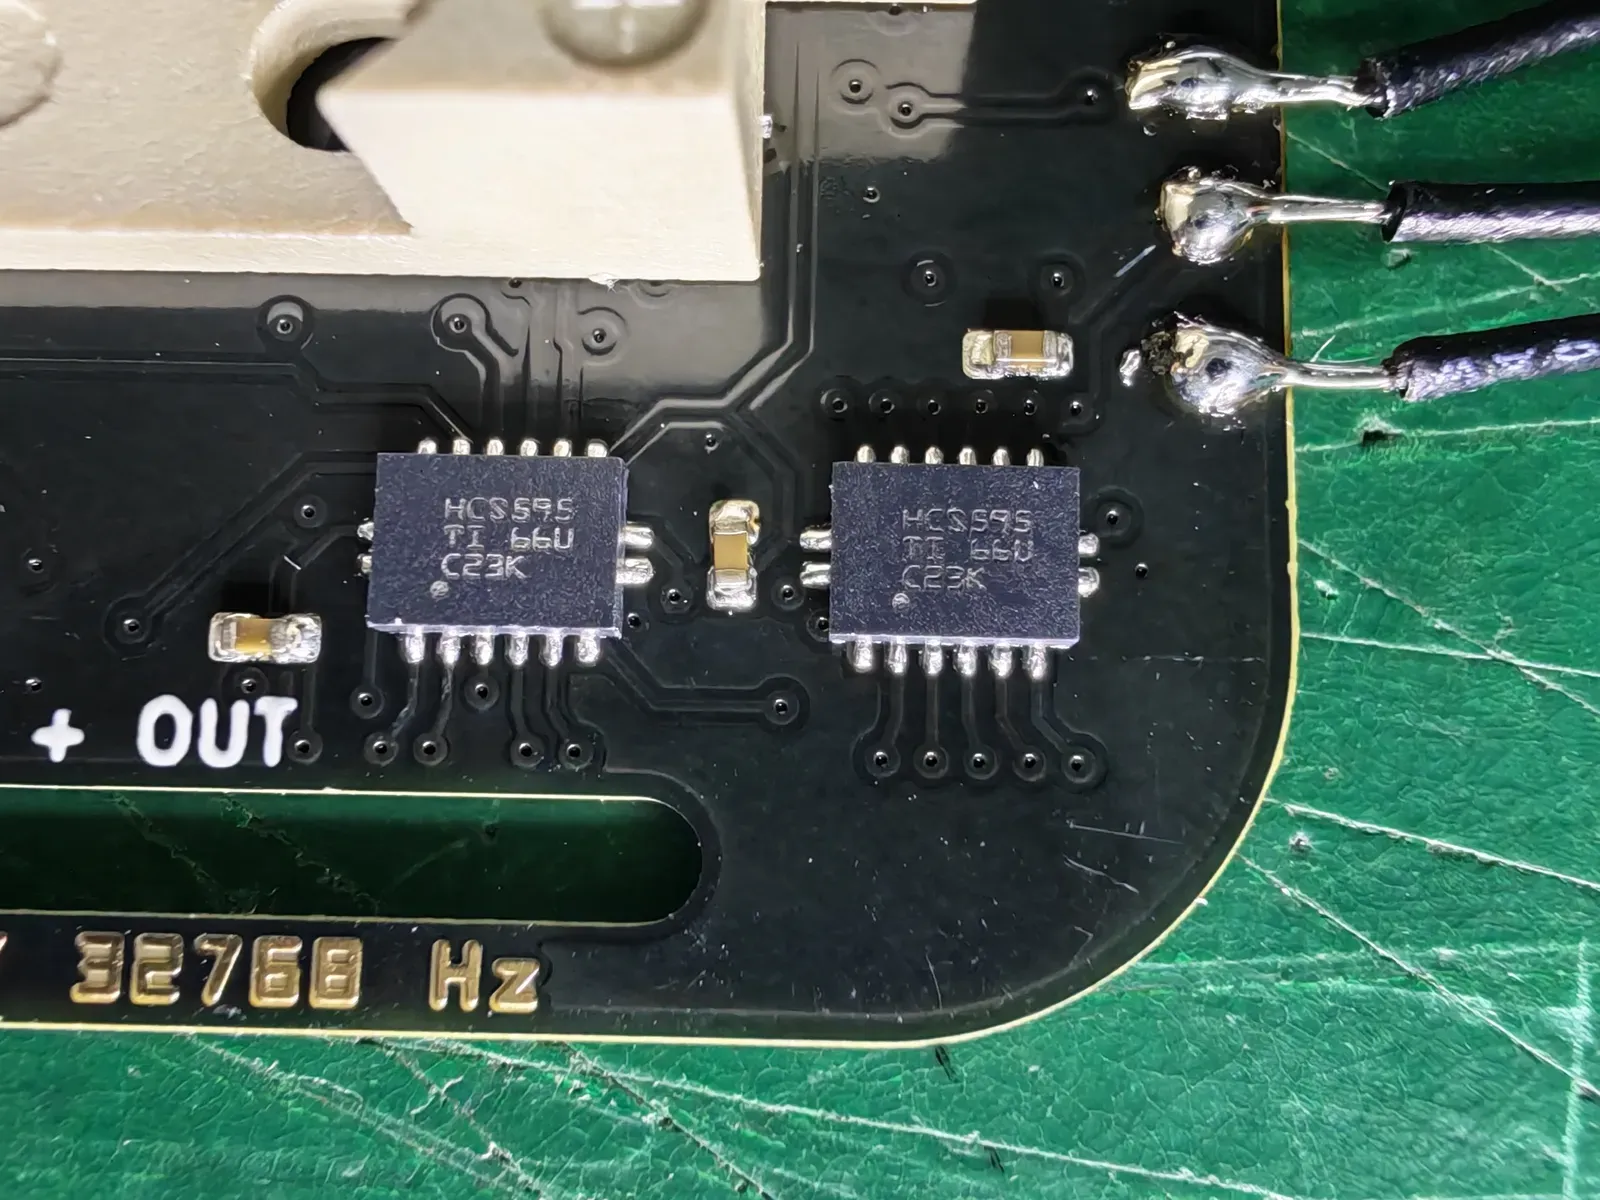
PCBWay’s close-up of 3 of the wire joints, each on a 1 mm pad. The 2 chips are shift registers that drive the outer LED ring.
The first boot
I put in a CR2032, and 3 lights came on: the 12 and 6 positions on the outer ring, plus a flashing hour at 12. That looked like a bug at first, but it’s the time-setting mode, which the watch enters on its first boot because the clock chip has no time saved yet. The flashing light is the hour you’re setting, and the 6 is a PM marker. A few button presses later, it was telling time.
11:49 on the alarm clock, 11:49 on the watch: the 11 hour light, with 12 just starting to fade in, and the minute light at 49.
The LEDs are a lot more striking at night. Holding both buttons for 3 seconds starts a 15-second show mode—comets chasing around both rings—that ends by settling back on the current time:
Show mode, then 10:07: the 10 hour light at full brightness, 11 starting to fade in, and the minute light just past 12.
By the design’s power math, a coin cell should last about 2.5 to 3 months at full brightness, and up to 6 or 7 months at the lowest brightness. That’s an estimate, though, not a measurement. I’ll find out the real number by wearing it.
What I’d tell someone thinking about this
I’ve been curious about circuits for a long time. I’ve played with Raspberry Pis and Arduinos, and I own a few beginner electrical engineering books, the kind with big pictures of resistors and capacitors on every page. They’ve mostly gone unread. Reading about components never stuck for me the way building something does, and this year I finally got to learn by doing. Every question I had came from something I was actually trying to make, so the answers had somewhere to land.
If you’re a software person who has been curious about hardware, I think the barrier has dropped a lot. The parts that used to need years of practice—the tools and the manufacturing details—are now the parts AI can help most with. What’s left is still yours: deciding what to make and checking whether it works. And for hardware, the place you find out whether it works isn’t on your laptop. It’s when the box arrives.
The box arrived on November 6.
If you want to try it, PCBWay handled the fabrication, assembly, programming and testing for this one, and they were patient with a first-time watchmaker.
> TL;DR: I designed Amber Dial, a wristwatch where a single 0.8 mm circuit board is the whole thing—case, dial and display. PCBWay fabricated and assembled it, and it arrived this week and kept time on the first try. My background is software, and the most circuits training I have is AP Physics. What I took away is that the gap between "I can write code" and "I can make a physical object" is a lot smaller than it was, and that a factory is the final test you can't fake.
*Disclosure: PCBWay sponsored this project with a credit toward fabrication and assembly. Links to PCBWay in this post use [my referral link](https://pcbway.com/g/MRMzcM), and I earn a small commission if you sign up and order through it.*

*The real thing. There's no case and no separate screen—the board is the watch.*
## The board is the whole watch
Most watches are a case with things inside it: a movement, a dial, hands, a crystal. Amber Dial has none of those. It's a single circuit board, and the display is the board too. 60 LEDs in the outer ring show minutes and seconds, 12 in the inner ring show the hour, and you read it by position like a regular analog watch. The black solder mask is the dial, and the gold numerals and markers are the same gold plating that protects the board's pads. A NATO strap threads through 2 slots cut into the board, and a CR2032 coin cell sits on the back.

*The whole stack, from my design renders: 1 populated board, a battery holder, a coin cell and a strap.*
What surprised me most when I first held it is how flat it is. Every component is tiny and surface-mounted, so the tallest things on the board are the 2 buttons on the sides, and the strap where it loops through the slots sits higher than anything else. You can run a finger across the face and it just feels smooth. I'd assumed an uncased board on my wrist would feel fragile, and it doesn't. I'm going to be careful with it anyway, and I'll update this post as I find out how it holds up.

*From the side. The whole watch is about 7.9 mm thick without the strap, and the coin cell holder on the back accounts for most of that.*
## I don't really know how to do this
I have a computer science degree and years of experience as a software engineer. Software turns out to be a small part of a project like this. Most of it is hardware: circuits, component selection, PCB layout, power budgets, manufacturing files. My formal background there is AP Physics 1 and 2 and the physics classes I took in college. Before this year I had never designed a circuit board.
There are really 2 halves to that kind of knowledge. One is theory—how the parts behave and the equations behind them. The other is practical: using the design tools, knowing what a factory needs from you, knowing which mistakes are expensive. I had a little of the first and none of the second.
This is my third board this year. The first was [Semaphore](/my-pcb-has-a-compiler.md), a little USB-C status light. The second was [a business card that lights up when you tap it](/the-business-card-that-lights-up.md). The watch is the most ambitious by far: 177 components on both sides of a 4-layer board, with a microcontroller, a real-time clock chip and 72 LEDs, all running for months on a coin cell.
What made it possible is AI. I've used AI almost every day for about 2 years now, going back to when Cursor was the new thing, so I'd call myself an advanced user. For this project I mostly just talked to it. I dictated the concept of a watch that reads like an analog dial but is made of light, then had the AI branch off in a bunch of different directions—different dial layouts, marker shapes, ways to show the hour—and kept picking the ones I liked and branching again from there. The design I ended up with is what that process converged on. It's a combination of my taste and a lot of iteration, more than any one big idea.
The design is only half of it, though. The other half is everything around ordering: which fields to fill in on the order form, which files the factory needs, what to check before paying, and how to talk to a factory's engineers about a board like this one. That's the part I'd have expected to take years of getting burned to learn, and AI streamlined it a lot. I still made the decisions about what the watch should be, but I didn't have to become an expert in the tools first.
So the watch is a reminder for me. It's a physical object on my wrist that says the edge of what I can build has moved, and it moved this year.
## The factory is the final test
Software has a comfortable property: you can run it and see. I can write tests, simulate, and check things a hundred ways. I did that for the watch too. The design passed every electrical and design-rule check, and I had a simulator for the buttons and the display. But none of that proves a physical watch will work.
The real test happened at a factory in Shenzhen. I designed the watch in my apartment, uploaded the files to [PCBWay](https://pcbway.com/g/MRMzcM), and they made the boards, sourced the parts, assembled everything, programmed the chip and tested the LEDs and buttons. If anything in my design was wrong, that's where it would show up. I [wrote about this idea earlier](/my-pcb-has-a-compiler.md)—a PCB factory is less like a printer and more like a compiler that runs your design through its own process and sometimes asks you to approve the result.
## What working with PCBWay was like
The ordering part was ordinary: upload the Gerbers, the parts list and the placement file, get a quote, pay. The interesting part was everything in between, and that's where their customer service mattered.
A project like this needs a lot of back-and-forth. Some examples:
- Quantity. I first asked for 2 assembled watches, saw the parts quote and changed it to 1. They re-quoted the assembly for a single unit without fuss.
- Programming. My design expected a pogo-pin fixture to flash the firmware, and they didn't have one for this board. So we agreed on 5 thin temporary wires soldered to the programming pads instead. They asked for detailed steps, so I made an illustrated guide showing exactly which pad gets which wire.
- Assembly check. Before finishing, they sent 8 close-up photos of the assembled board and asked me to confirm the orientation. Watch LEDs are tiny diodes, and one placed backwards just stays dark, so I asked them to double-check the LED polarity before approving. They confirmed it and we moved on.

*2 of the 8 photos PCBWay sent me to approve before testing: the front and the back, with the temporary programming wires attached.*
None of these were problems exactly. They're the questions that come up when the person building your design is careful. It felt more like working with an engineer on the other side of the world than ordering from a website.
As for the boards themselves, I honestly have nothing to complain about. The component placement looks very clean, the gold finish is smooth, and I couldn't find a single defect. The thing I appreciated most was the edges. With boards I've ordered before, the edges came with leftover bits of the panel they were cut from, and I had to snap those off and sand the edges myself. These came already smooth, which matters a lot more when the board is sitting on your wrist.
AI helped a lot with the communication. For the programming guide, I sent an English version as the ground truth along with a Chinese translation, so the technicians could read it in their own language and still check anything ambiguous against the original. I did the same with the assembly reference drawing. It's a small thing, but I think it cut out a whole round of clarifying emails.

*Page 1 of the guide I sent PCBWay. Every instruction is in English with the Chinese right under it.*
The timeline: I paid on September 29, and the watch arrived on November 6—about 5.5 weeks, including the photo review.
Here's what it cost, since I always want to know this when I read these posts:
| What | Cost |
|---|---|
| 5 bare PCBs (4-layer, 0.8 mm, gold finish) | $57.43 |
| Components for 1 watch | $73.59 |
| Assembly, including programming and testing | $105.07 |
| Economy shipping | $35.00 |
| Total | $271.09 |
PCBWay's sponsorship covered $200, and a $5 new-customer coupon took off a little more, so I paid about $66 plus a payment handling fee. 1 assembled prototype is the most expensive way to buy anything—the assembly setup costs about the same whether you make 1 watch or 20—so the per-watch price would drop a lot at a bigger quantity.
## Unboxing (and a small panic)

*The assembled watch came in its own bag, labeled "PCBA." I found the bare spares first.*
When I opened the package, the first boards I found were completely bare—just the printed outlines of every part. The chip in the middle was a picture of a chip, and there was no battery holder on the back. For a minute I thought the assembly had gone missing. Then I found the real watch wrapped separately. I'd ordered 5 bare boards and 1 assembled, so the 4 blanks were exactly what I paid for. I just hadn't thought about what a bare spare would look like.
The assembled watch still had the 5 programming wires attached to the back, which I'll remove with a soldering iron rather than rip off (the pads are only 1 mm across).

*PCBWay's close-up of 3 of the wire joints, each on a 1 mm pad. The 2 chips are shift registers that drive the outer LED ring.*
## The first boot
I put in a CR2032, and 3 lights came on: the 12 and 6 positions on the outer ring, plus a flashing hour at 12. That looked like a bug at first, but it's the time-setting mode, which the watch enters on its first boot because the clock chip has no time saved yet. The flashing light is the hour you're setting, and the 6 is a PM marker. A few button presses later, it was telling time.
<video src="/videos/amber-dial-matches-clock.mp4" autoplay muted playsinline loop width="360"></video>
*11:49 on the alarm clock, 11:49 on the watch: the 11 hour light, with 12 just starting to fade in, and the minute light at 49.*
The LEDs are a lot more striking at night. Holding both buttons for 3 seconds starts a 15-second show mode—comets chasing around both rings—that ends by settling back on the current time:
<video src="/videos/amber-dial-night-show-mode.mp4" autoplay muted playsinline loop width="360"></video>
*Show mode, then 10:07: the 10 hour light at full brightness, 11 starting to fade in, and the minute light just past 12.*
By the design's power math, a coin cell should last about 2.5 to 3 months at full brightness, and up to 6 or 7 months at the lowest brightness. That's an estimate, though, not a measurement. I'll find out the real number by wearing it.
## What I'd tell someone thinking about this
I've been curious about circuits for a long time. I've played with Raspberry Pis and Arduinos, and I own a few beginner electrical engineering books, the kind with big pictures of resistors and capacitors on every page. They've mostly gone unread. Reading about components never stuck for me the way building something does, and this year I finally got to learn by doing. Every question I had came from something I was actually trying to make, so the answers had somewhere to land.
If you're a software person who has been curious about hardware, I think the barrier has dropped a lot. The parts that used to need years of practice—the tools and the manufacturing details—are now the parts AI can help most with. What's left is still yours: deciding what to make and checking whether it works. And for hardware, the place you find out whether it works isn't on your laptop. It's when the box arrives.

*The box arrived on November 6.*
If you want to try it, [PCBWay](https://pcbway.com/g/MRMzcM) handled the fabrication, assembly, programming and testing for this one, and they were patient with a first-time watchmaker.